After modeling an original Peterbilt truck and modeling Optimus Prime head, here I will show you how I modify that Peterbilt truck into Optimus Prime body parts. I have to tell you that this article is not a step by step tutorial. In my opinion, changing a truck into robot parts is a long, complicated and boring process. This process requires me to do a lot of trial and error to get the right dimension and movement for later animation. It's difficult for me to write the whole process into step by step tutorials. If you have followed all of my previous tutorials, I am sure you can do this by yourself. All you need to do is cutting and detaching polygons. Here I only show you the big picture.
1. First, you need to know how you will animate the robot. I refer to the Optimus Prime deformable toy here. Once you understand the transformation, you will know how to cut and split the truck into pieces.
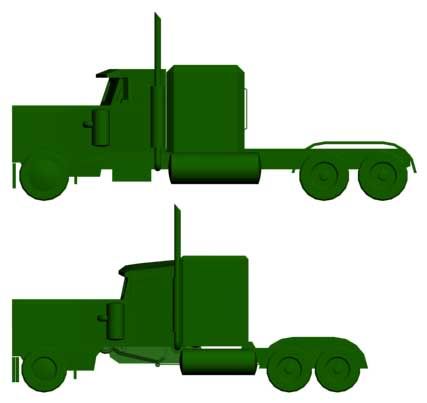
Based on the toy transformation, I noticed that I need to modify the truck dimension to fit the requirement. Image below show the original Peterbilt truck (top image) and the modified truck (bottom image). The modified truck is shorter. The hood is longer. It also has smaller wheels.
2. To split object, you may need to cut polygons first. As an alternative Connect is also useful. Then detach selected polygons to split the truck into new object.
3. Next step, is to fill the hole with polygons. You can use Create button to create polygons manually. Then repeat the process, cut and detach.
4. Sometimes you need to delete un-necessary polygons. Or add thickness using Shell modifier. Remember to use Inner amount
The basic principle is "When you modify or split something, don't change the Peterbilt truck appearance ". For example always use Shell modifier with Inner Amount. You also should not accidentally move detached object, because misplaced object will make your render looks bad
part 2by Didik Wijaya
 In Part 1 article, you knew the basic of cutting and detaching. In this article I will show you how I modfy the entire Peterbilt truck into Optimus Prime body parts.
1. Image below shows how we will modify the truck. .
2. The hood has legs inside. This is the similar leg I created for Gundam. Read Gundam leg modeling tutorial here.
3. The cab is used as upper body, and under it there's lower body. Inside the cab, you can put Optimus Prime head. Lower body is similar to the one I created for Gundam. I added several modifications. Read how to model Gundam body here
4. Rear tires is used to form legs. Here I add several thin boxes to connect rear tires to the back of upper legs.
5. The most complex process is creating arms. I used arms and hands similar to the one I created for Gundam. Read how to create Gundam arm and hand here. Notice that upper arm is rotated a little bit


Thousands of used IVECO truck
ReplyDeleteparts for sale from truck traders and operators at trucklocator. All makes and models of lorries-find tippers,tractor units and rigids for sale in the UK
I found this site very much helpful regarding to Iveco Truck parts it contain upon a pool of information about every sort of issue and concern.
ReplyDelete