part 1
by Didik Wijaya
 I watched "The Last Airbender The Movie (2010)" and I think it is absolutely a lame movie. I hate all of the casts. I'd better watch the original animated series. But, the special effects is very good, especially the waterbending. That's why I decided to write waterbending effect using 3ds max Particle Flow tutorial. If you don't know Particle Flow, I suggest that you read my beginner tutorial first: Getting Started With Particle Flow. In this site you can also find a lot of tutorials about Particle Flow.
1. I divided this tutorial into 4 parts. (1) Preparing background movie, (2). Creating particle, (3), Moving particle to any direction you want, (4) Making particle looks like water.
Let's go to Step 1, Preparing background movie. First, download this file. This compressed file contains mpg video we will used as background later, sample of finished movie, and sample of finished 3ds max file.
Open a new 3ds max file. Create free camera in Front viewport. Then change Perspective viewport into Camera view (Right click inside Perspective viewport, and press "C").
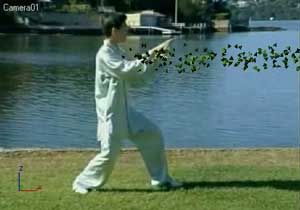
2. In 3ds max, you can use video as background. Go to Render>Environment. In opened window, click None button under Environment Map. Choose "taichi.mpg" as background. This is a 30 seconds video about a guy performing taichi. I found this video on youtube then converted it into mpg format.
To display video in background, make sure Camera viewport is active (yellow line around viewport). Go to Viewport Background window (Views>Viewport Background or Alt+B). Check Use Environment Bakcground. Also check "Display Background".
3. You will see video as background in Camera viewport. If you don't, try to move slider, this will refresh the viewport, and you will see the video in viewport.
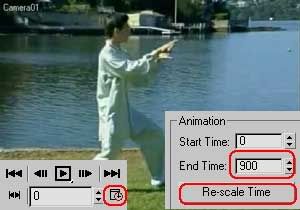
The video is 30 seconds in length, so we need to add more frames. Click Time Configuration button. In opened window, enter End time =900 and click Re-scale Time. (30seconds x 30fps = 900 frames)
part 2
by Didik Wijaya
In Part 1 tutorial, we have prepared the background video. Now, in this tutorial you will create particle system using Particle Flow, an advanced particle system in 3ds Max.
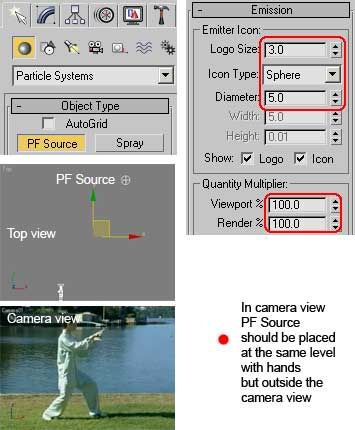
1. In Command Panel, choose Particle Systems from drop down list. Then click PF Source button. Click and drag in Top viewport to create PF Source icon. Go to Modify tab, and adjust several settings.
Set Logo Size=3, Icon Type=Sphere, Diameter=5, and Quantity Multiplier both 100% in viewport and render. Position this PF Source icon in font of camera (in Top viewport)..
Also in Camera viewport, position PF Source icon at the same level with the guy's hands, but a little bit outside the camera view (right side). I want the particle emits from right side of the screen later.
2. Open Particle View window (Press 6). In Event 01, highlight Birth 01 operator, set Emit Start=0, Emit Stop=20 and Amount=1000. Thousand particles will emits from frame 0 to 20. You can use fewer particle amount if your computer is slow.
Highlight Shape 01 operator, set Size=10 and, Scale=5%. This will reduce particle size.
Highlight Display 01 Geometry. Set Display=Geometry. This will make you able to see particle in viewport clearly.
From Depot, click and drag Spin operator into Event 01 to add this operator. This operator will spin particles.
3. Try to move slider. You will see particle moving from right side of the screen. Next task is to move particle to the direction we want.
part 3
by Didik Wijaya
In Part 1 tutorial, you have prepared background video, and in Part 2 tutorial, you have created Particle Flow. Now, you will move the particle into the direction we want. Thus, the guy in the video will looks like controlling the particle.
1. In Particle View window, click and drag Speed By Icon from Depot into Event 01. Make sure this operator replaces Speed 01 operator. Use Speed Variation, Min=80% and Max=100%. Use Icon Size = 3. In viewport, you will find Speed By Icon icon (square with arrow inside). Particle will move towards this icon. If we animate this icon, particle will also follow the movement.
2. You may want to rotate this icon 90 degrees, so you can see clearly in Camera viewport. Make sure you are in frame 0, and position this icon at the same spot with PF Source icon.
Next, we will animate Speed By Icon icon. Turn on Auto Key. move slider to frame 50, and move this icon closer to guy's hands. Then, move slider to frame 100, and also move this icon closer to guy's hands. Repeat this process at each 50 frames. When finished, turn off Auto Key.
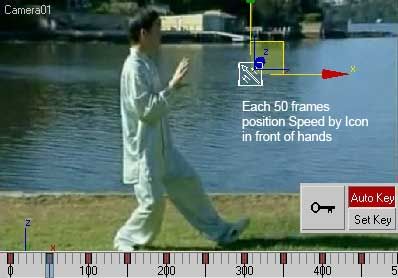
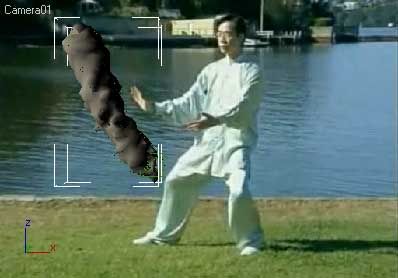
3. Try to move slider, you will see particle is "controlled" by guy's hands.
part 4
by Didik Wijaya
Final step is changing the particle to looks like water. This is doable using BlobMesh and Material Editor. Let's get going and be The Last Waterbender.
1. Go to Command Panel, click Create>Geometry. Choose Compound Objects from drop down list. Click BlobMesh. Click anywhere in viewport. Go to Modify tab and set Render=0.5, and Viewport=1. If your computer is slow, you should increase Evaluation Coarseness value in Render or Viewport. These values controls the quality of BlobMesh. Smaller values gives smoother BlobMesh surface. (Render = smoothness when rendered, Viewport=smoothness in viewport display).
Under Blob Objects, click Add button, and choose PF Source 01. Now, you will see blobby like liquid.
2. Actually, the original particle is still visible in viewport. Open Particle View. Select or highlight Event 01 name (until it turns white), right click and choose Properties. In opened window, set Visibility=0. Click OK.
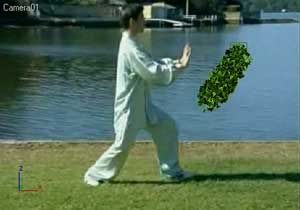
3. Image below shows rendered BlobMesh. Next, we need to apply water material.
4. Open Material Editor. Select one of unused material slot. Click Standard button and change to Raytrace. In Raytrace Basic Parameters, use Shading=Phong or Blinn. Diffuse= blue (water color R=121, G=153, B=207), Reflect=(R=62, G=62, B=62), Transparency=(R=216, G=216, B=216). Specular Level=100, Glossiness=30
In Extended Parameters, use Reflections Type=Additive.
All of these setting will create shiny, reflective and also transparent material. Apply this material to BlobMesh object.
5. Add lights if you want. Render the animation. Waterbending Effect using 3ds Max Particle Flow tutorial is finished


No comments:
Post a Comment