I created this scene in 3DS Max with some help of Photoshop.
Ice planets are mostly made of solid ice, or freezing water with ice chunks or frozen land masses floating in the freezing water.
These planets are not very suitable for human life because of the freezing temperatures.
However they are great places for secret outposts or military bases.
Sources used:
1: http://my3dtextures.com/pages/sky.html
2: http://www.morguefile.com/archive/display/746544
3: http://my3dtextures.com/gallery/Sky/Planets/images/Rings%20%287%29.jpg
4: http://my3dtextures.com/gallery/Sky/Night-Sky/images/Night-Sky%20%282%29.jpg
5: http://planetpixelemporium.com/earth.html
6: http://my3dtextures.com/gallery/Sky/Planets/images/Planets%20%288%29.jpg
Author:
Ice planets are mostly made of solid ice, or freezing water with ice chunks or frozen land masses floating in the freezing water.
These planets are not very suitable for human life because of the freezing temperatures.
However they are great places for secret outposts or military bases.
Sources used:
1: http://my3dtextures.com/pages/sky.html
2: http://www.morguefile.com/archive/display/746544
3: http://my3dtextures.com/gallery/Sky/Planets/images/Rings%20%287%29.jpg
4: http://my3dtextures.com/gallery/Sky/Night-Sky/images/Night-Sky%20%282%29.jpg
5: http://planetpixelemporium.com/earth.html
6: http://my3dtextures.com/gallery/Sky/Planets/images/Planets%20%288%29.jpg
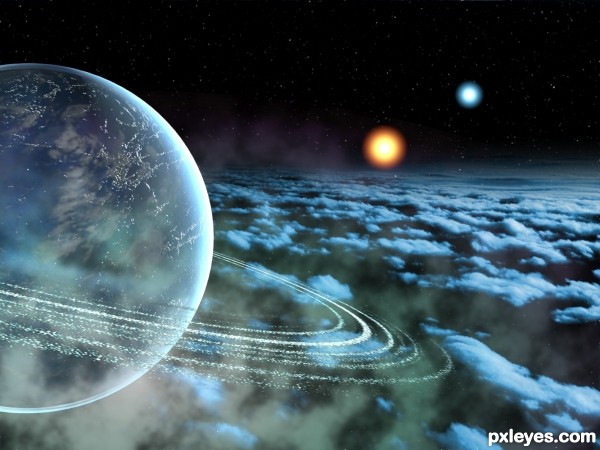
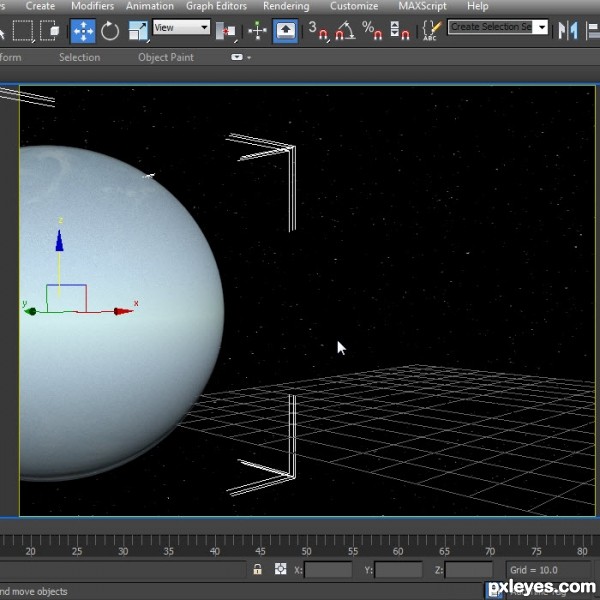
End result:
Author:
Views: 34266
Score: 8.31 / 10
Author earned: $30
Step 1
Start by creating a sphere with 100 segments. It can be any size, I made mine 36.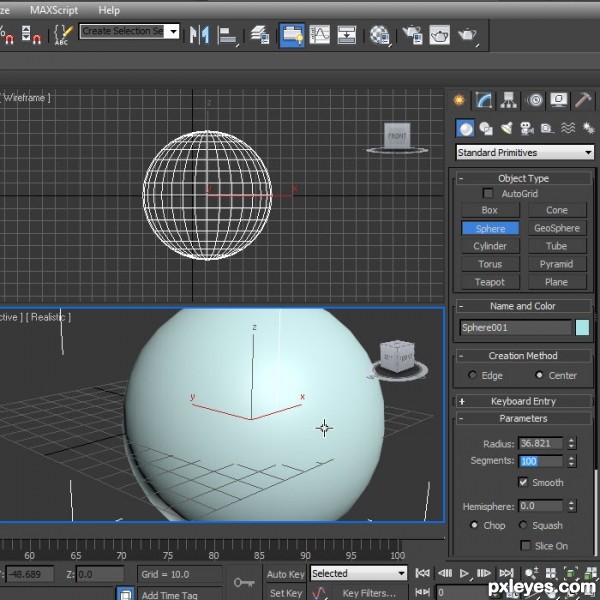
Step 2
Next Right click your sphere and chose clone.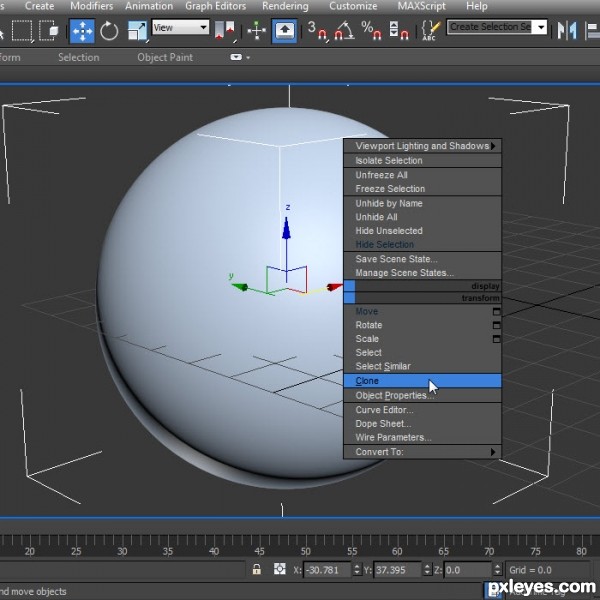
Step 3
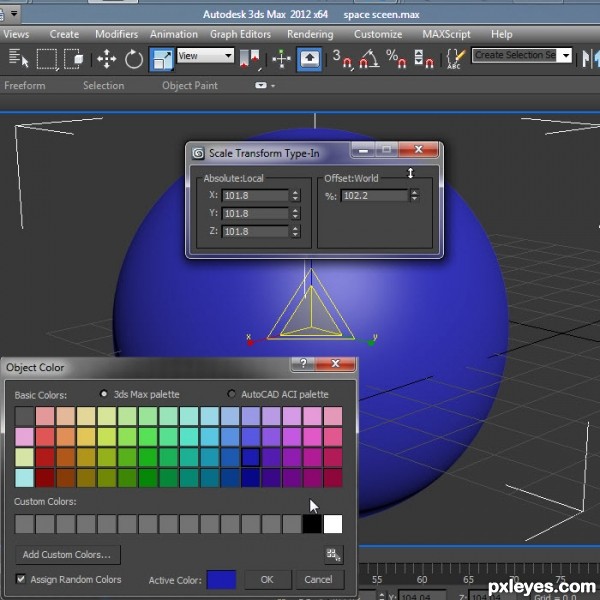
Next select your scale command and Right Click on it.This will open a new box with some sliders, move the offset world slider up a small amount.
Name this sphere clouds.
Step 4
Clone it again and repeat the same steps, name it atmosphere and re-size the third sphere.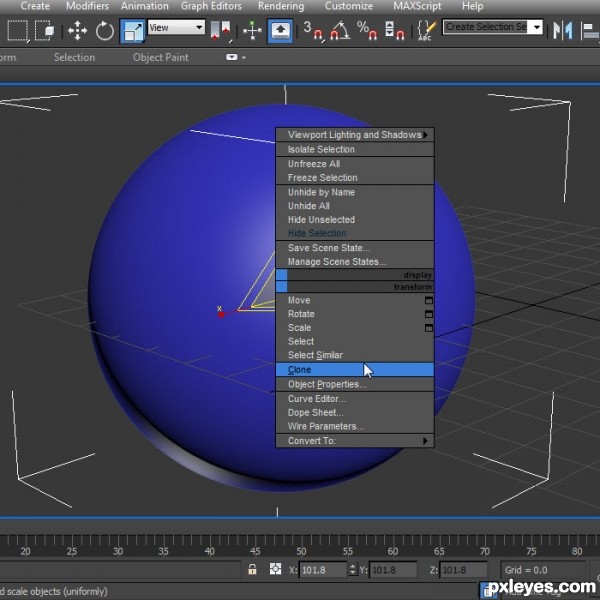
Step 5
Now Save your scene in your model directory.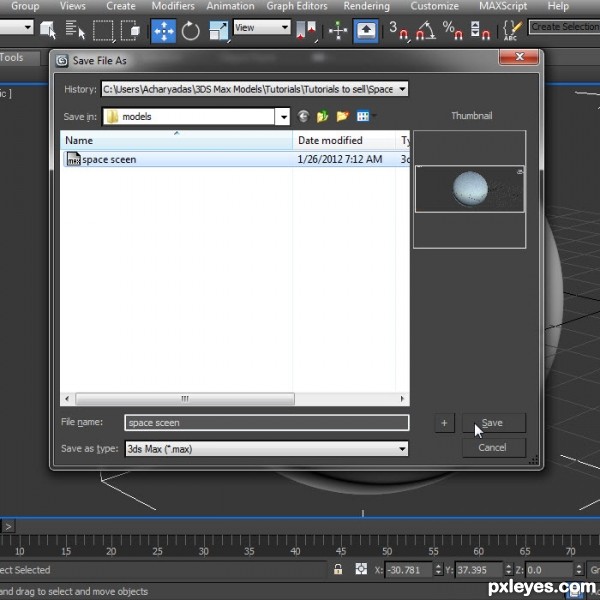
Step 6
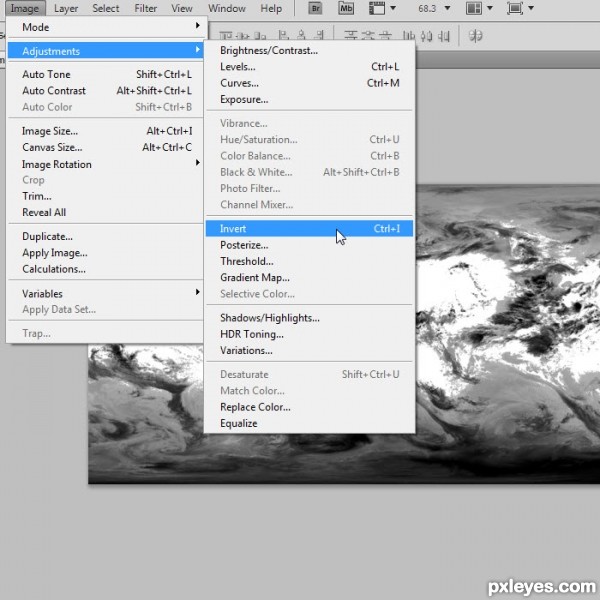
Next bring in your black and white cloud texture in to Photo shop. You can get the cloud texture here.http://planetpixelemporium.com/earth.html
Next we want to invert it, so we can hold down Ctrl and then press I or go to Image then Adjustments and then Invert.
Next Save your image to the same file.Sources used: 7: http://planetpixelemporium.com/earth.html
Step 7
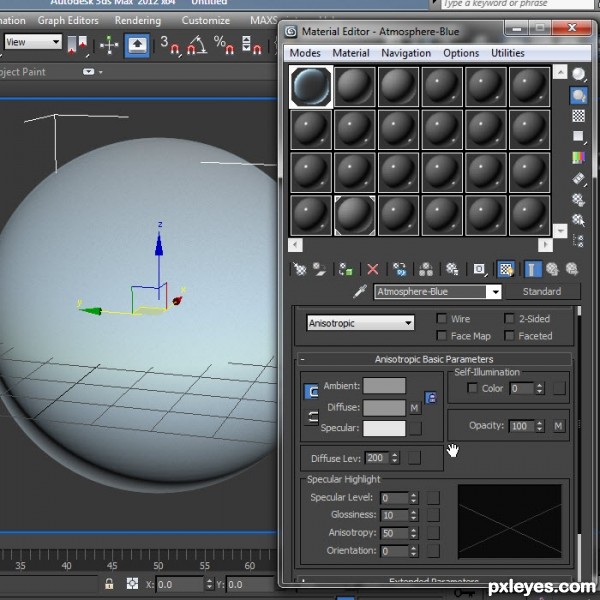
Next open up your materiel editor, it should be the icon up top with a sphere that is checkerboard.Next change Blinn to Anisotropic, Specular level to 0, glossiness 0, anisotropy 50, orientation 0.
Step 8
Next is to ad a falloff map in the diffuse and opacity map channels.Do the diffuse channel first and then copy it to the opacity channel as an instance.

Step 9
Chose Perpendicular / Parallel as the falloff type. Then chose a light blue color for the bottom channel.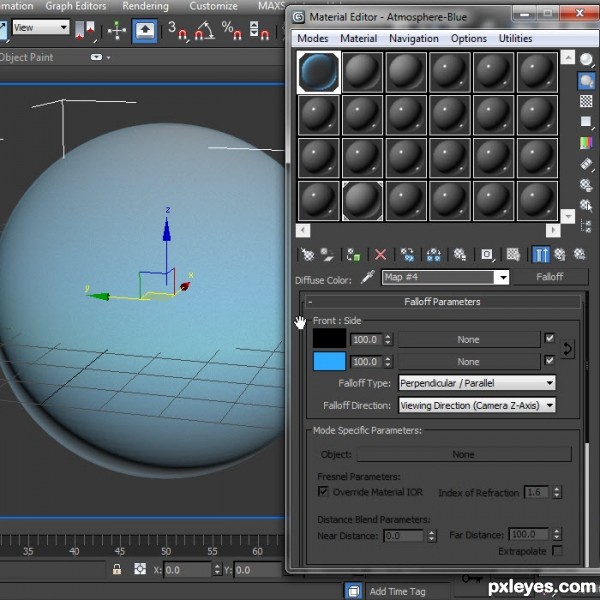
Step 10
Next apply it to the atmosphere sphere you created and then Right click on the sphere and chose Hide Selection.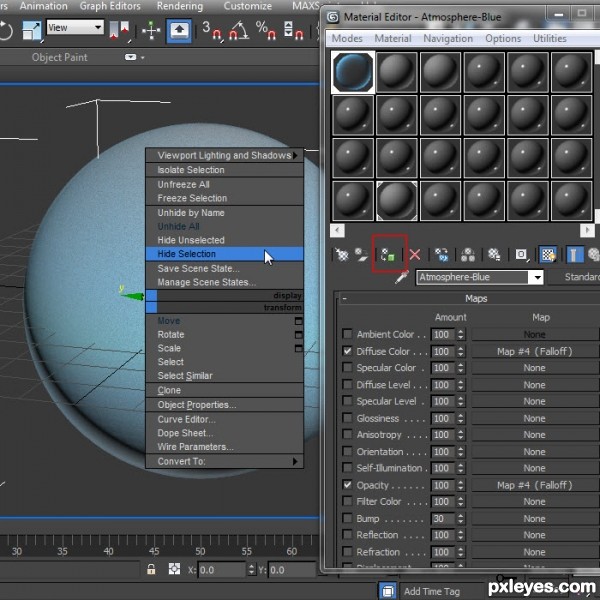
Step 11
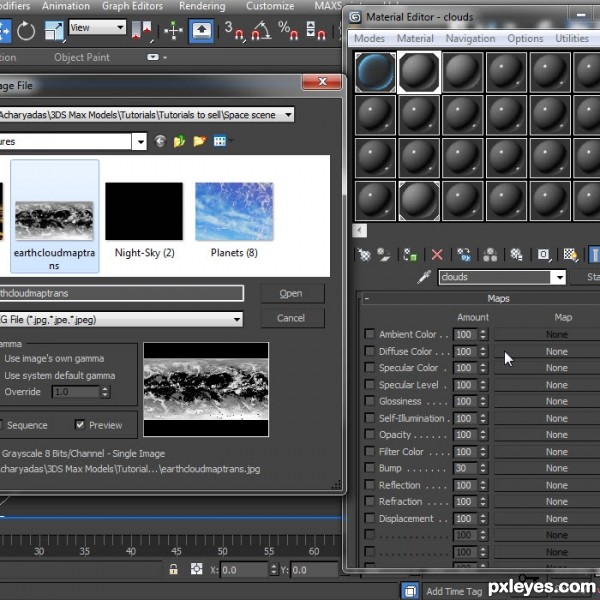
Next select a blank texture map and click on the diffuse map channel, next navigate to your texture directory where you saved your cloud texture you downloaded.Pick this texture. Sources used: 8: http://planetpixelemporium.com/earth.html
Step 12
Next copy the map into the opacity map channel as seen here and apply it to the sphere called clouds.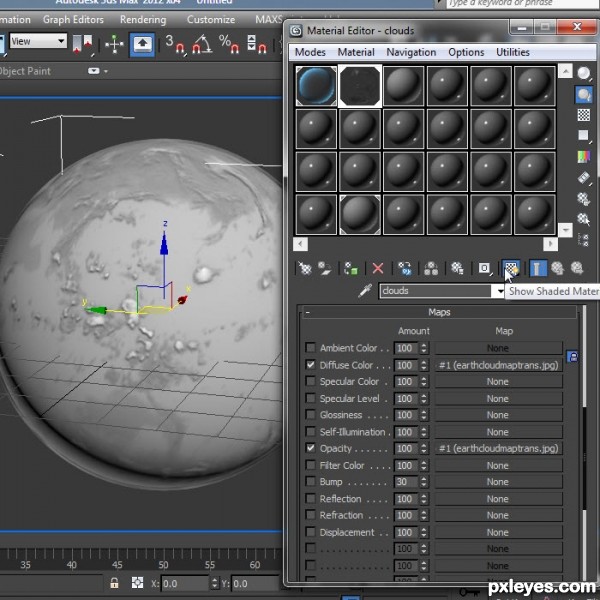
Step 13
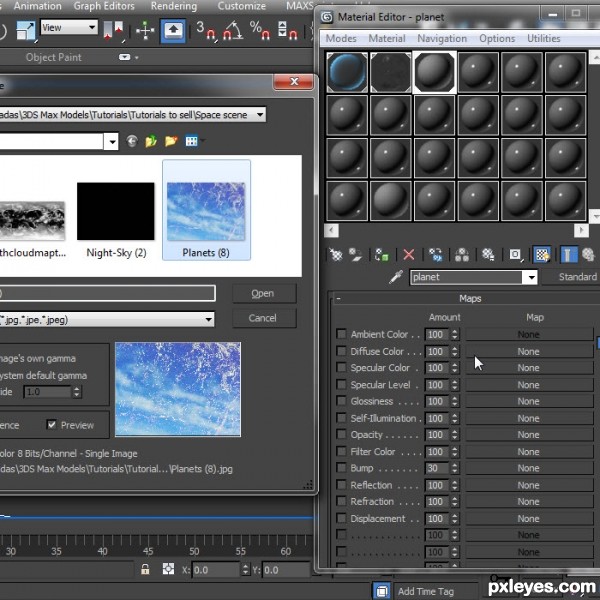
Next Right click on the cloud sphere and chose Hide Selection once again.Next sphere we are going to apply a planet texture. You can use any type of planet texture you like, this is the planet texture I used.
http://my3dtextures.com/gallery/Sky/Planets/images/Planets%20%288%29.jpg
Sources used: 9: http://my3dtextures.com/gallery/Sky/Planets/images/Planets%20%288%29.jpg
Step 14
In the map channels I made a copy of the planet texture and placed it in the bump channel.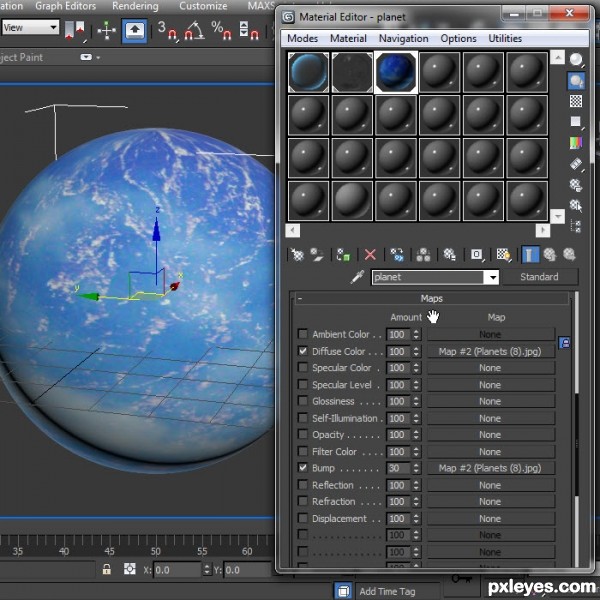
Step 15
If we do a render now we should get something like this.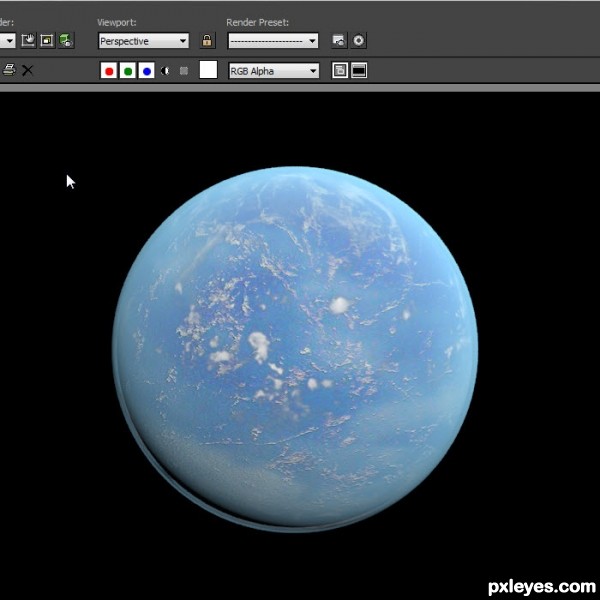
Step 16
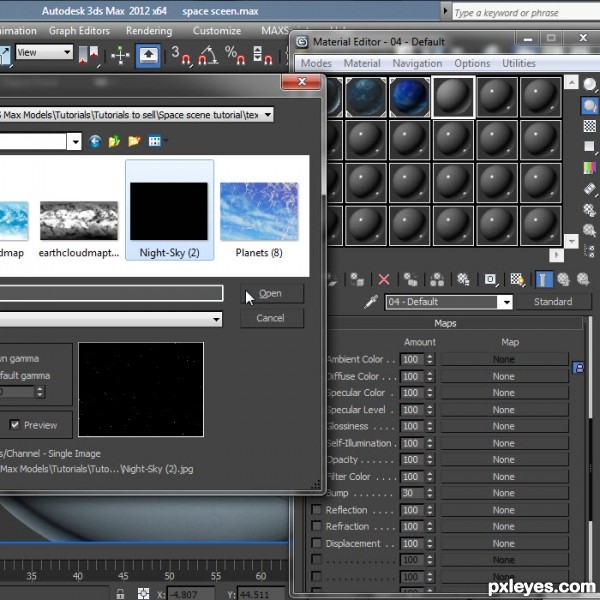
Next we want to create the outer space, we will use a texture for this.You can get the texture I used from here.
http://my3dtextures.com/gallery/Sky/Night-Sky/images/Night-Sky%20%282%29.jpg
Place this texture into a blank texture sphere in the diffuse channel.
Sources used: 10: http://my3dtextures.com/gallery/Sky/Night-Sky/images/Night-Sky%20%282%29.jpg
Step 17
Next change it to Environ in the diffuse map settings.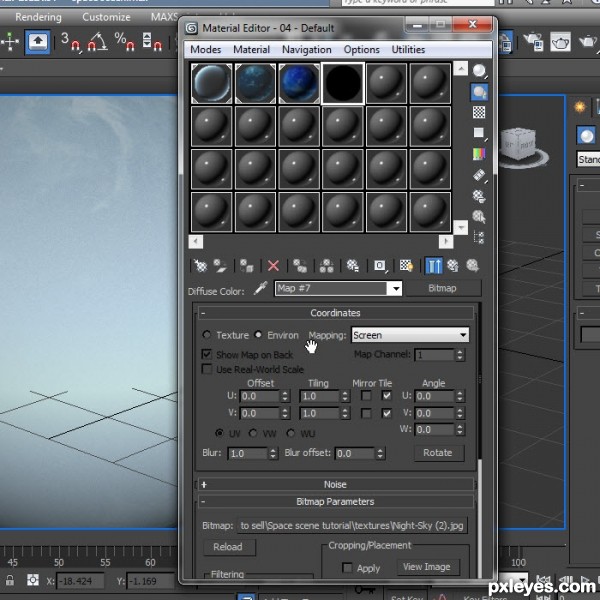
Step 18
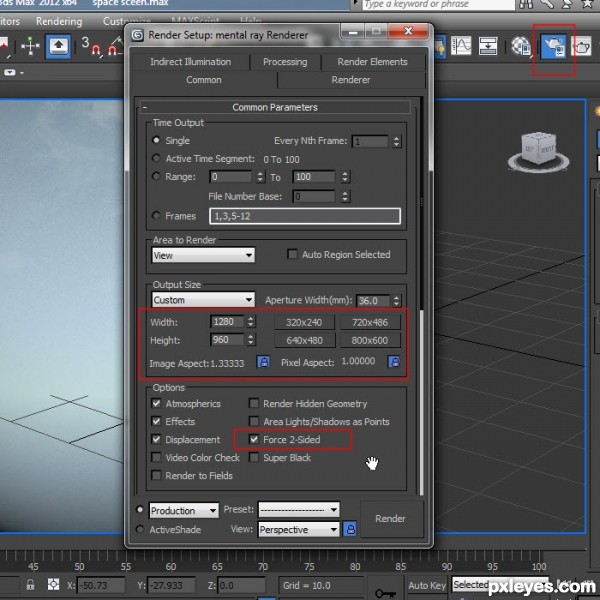
Next open your Render Setup box. I am using Mental Ray Renderer that comes standard with 3DS Max. However you can use almost any renderer and get the same results.We want to increase the width and height to match the dimensions of the stary texture map we just downloaded and set as our environment map.
I also like to use Force 2-Sided
Step 19
Next to get an accurate view of what will be rendered in our scene, Right click on your perspective letters in the top left and chose Show Safe Frames.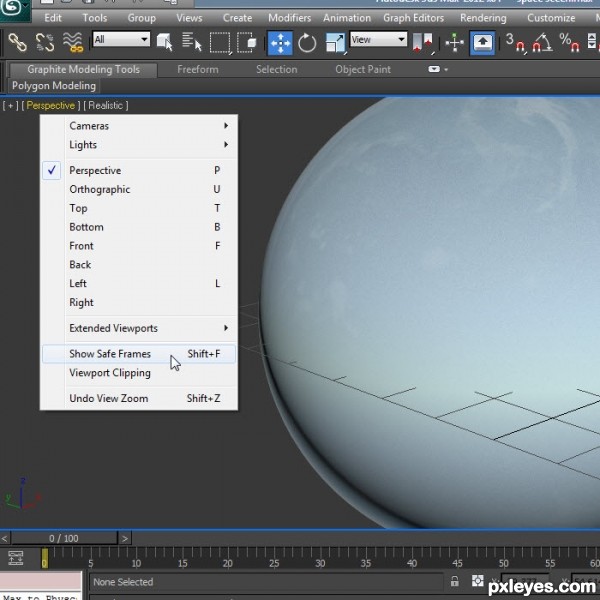
Step 20
Next click on Rendering then on Environment.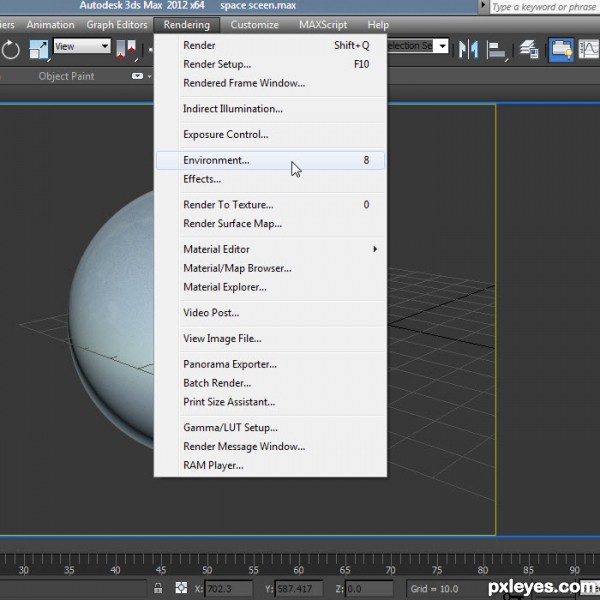
Step 21
Next drag and drop the night sky (2) texture you have into the Environment Map channel in your Environment box as seen here.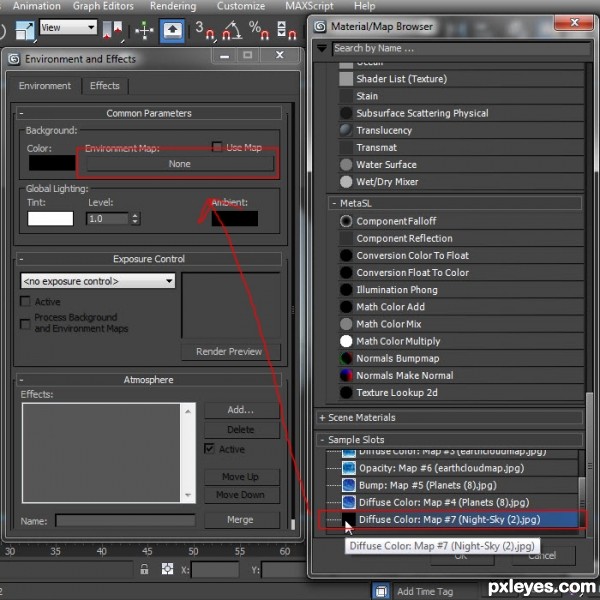
Step 22
Next click on Views then Viewport Background and then check mark Show Background.Repeat steps and next chose Viewport Background.
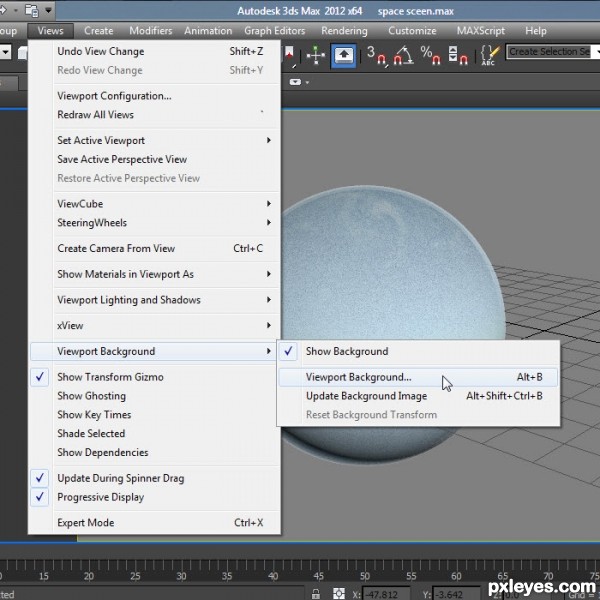
Step 23
Next check mark Use Environment Background and also Display Background.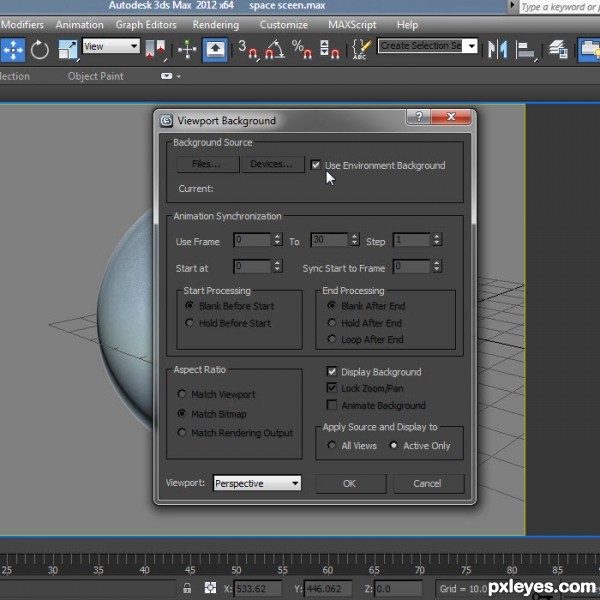
Step 24
We should now have something like this in our viewport.Select your planet and move it to the left as seen here.
Step 25
One more step we need to do in our material editor, select your cloud texture and increase Self-Illumination to 10.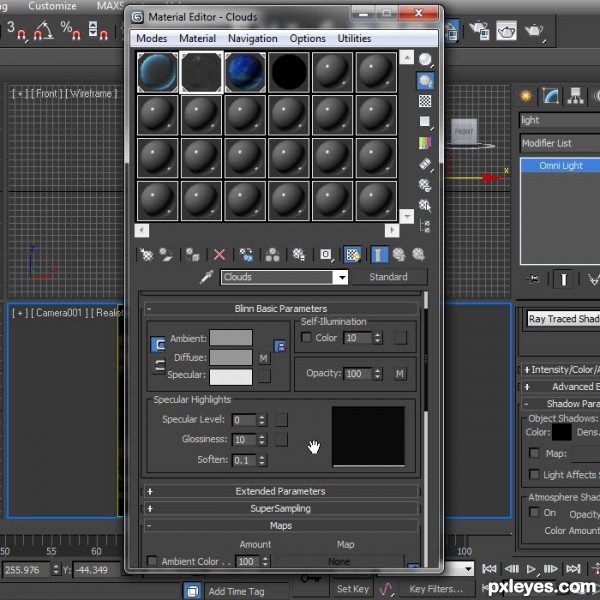
Step 26
Create a camera in your scene or click on your perspective viewport and press Ctrl + C to create a camera at that view.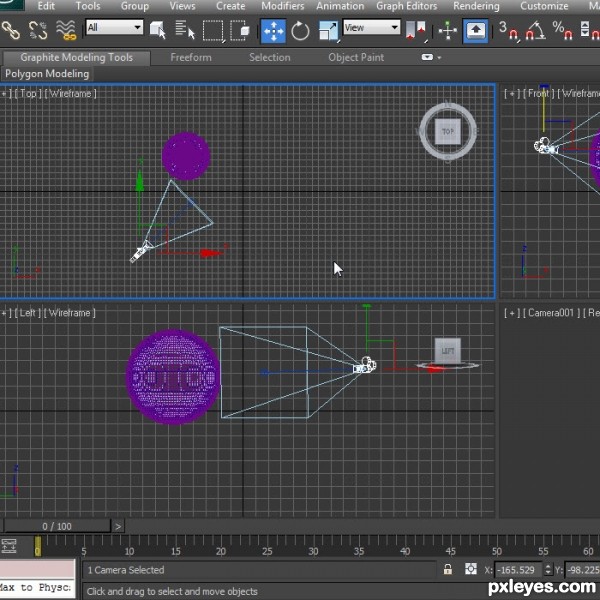
Step 27
Next click on your light tab and select Omni as your light type.
Step 28
Place a light in your scene like this. Name it Sun.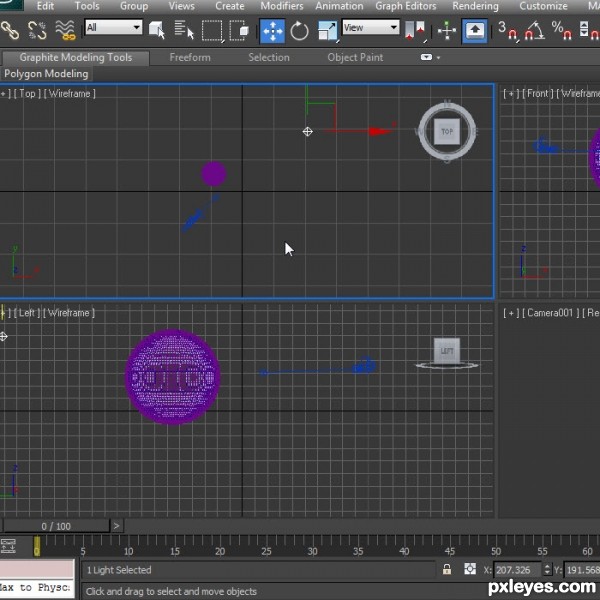
Step 29
Next copy the light and move it so that it lights up the planet a bit more, we want to give the appearance that the sun is lighting up half of the planet.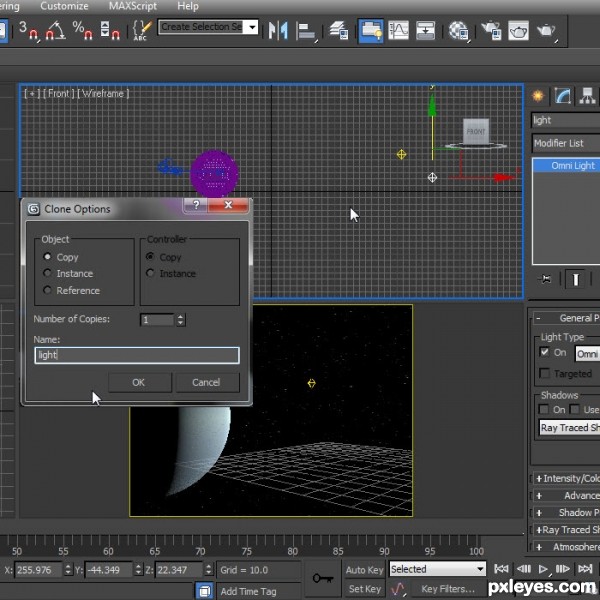
Step 30
Make this light give a shadow to the planet.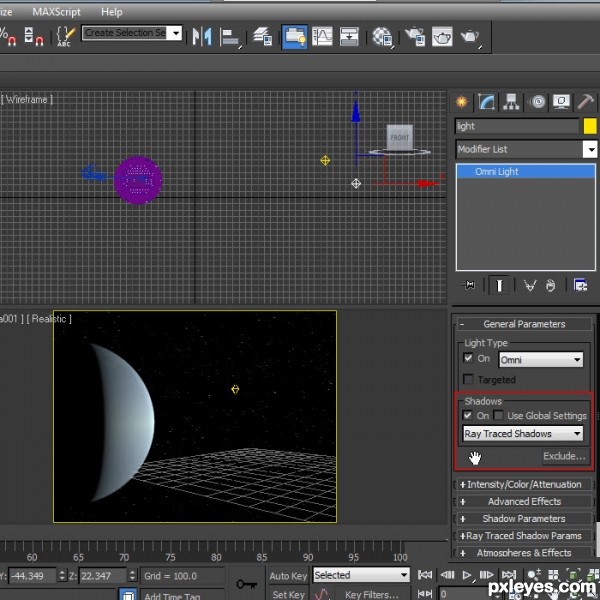
Step 31
Increase the Sun light Multiplier to 3.0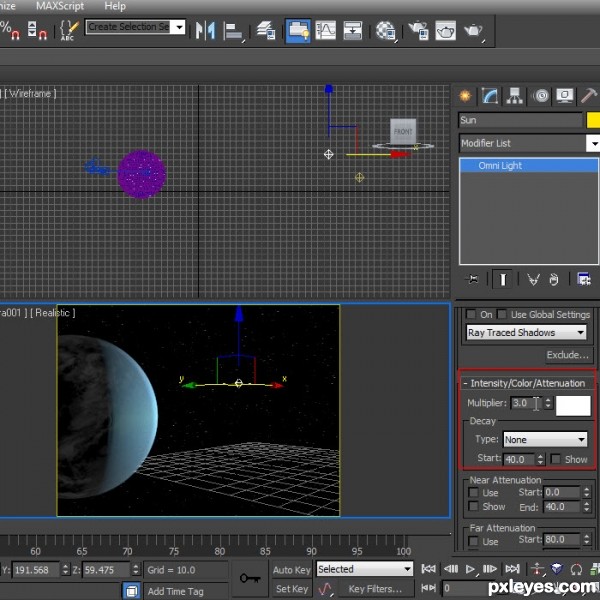
Step 32
Do a test render and we should get something like this.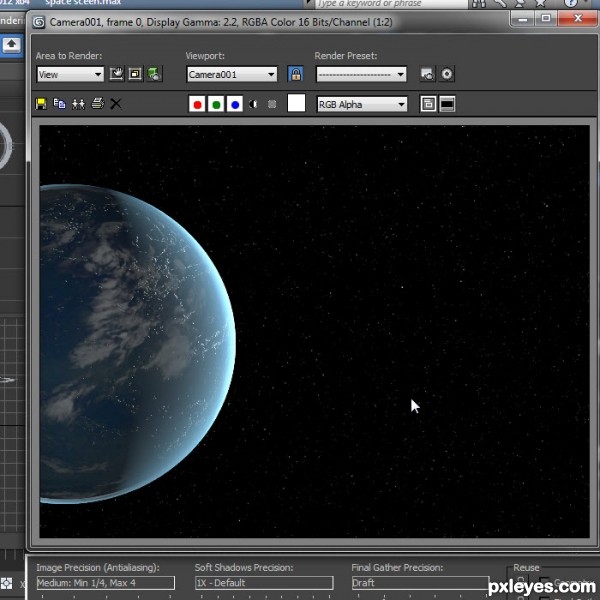
Step 33
Next create a plane that is square and centered on your planet. This will be our planet rings.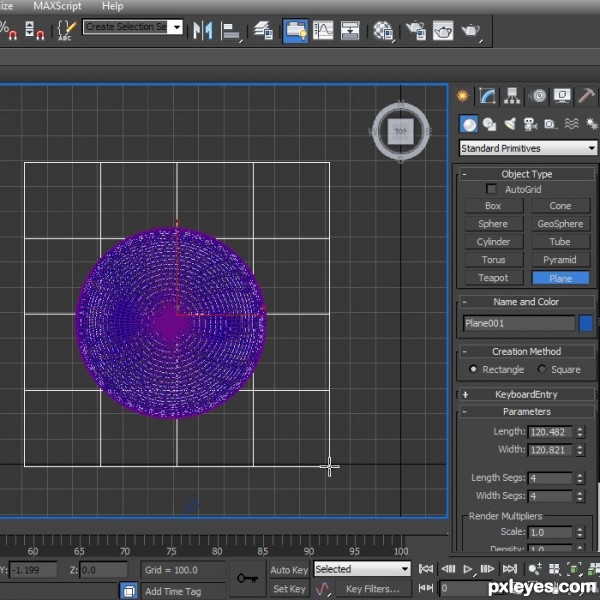
Step 34
Scale it up if the plane is to small.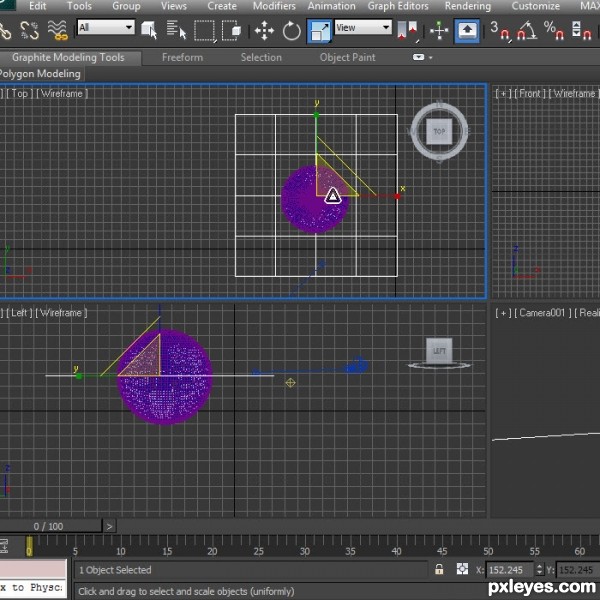
Step 35
Next rotate the plane so it looks like a set of planet rings on an axes.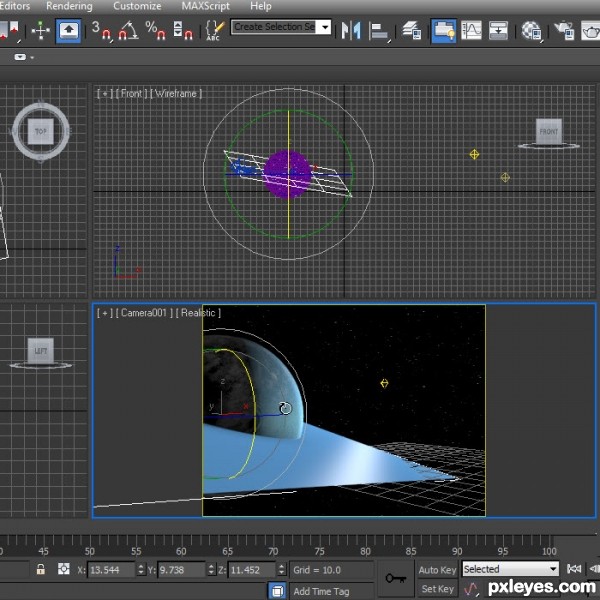
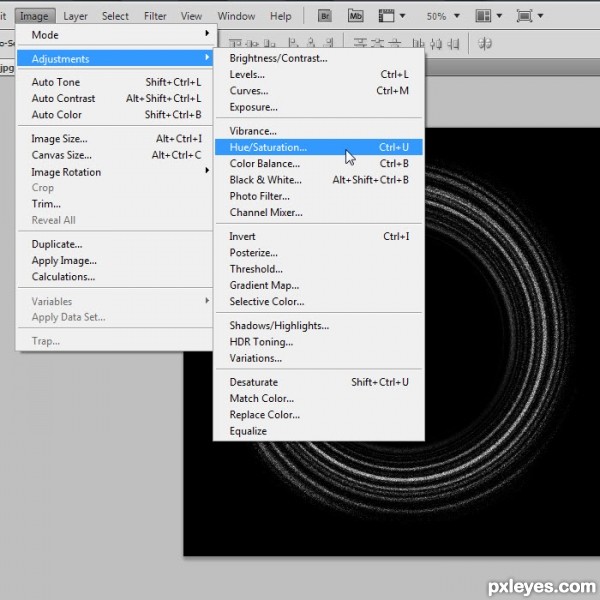
Step 36
Next bring your planet rings texture into Photo shop and apply a Hue/Saturation filter to it.You can find the ring texture here.
http://my3dtextures.com/gallery/Sky/Planets/images/Rings%20%287%29.jpg
In Photoshop go to Image, then Adjustments and then Hue/Saturation.Sources used: 11: http://my3dtextures.com/gallery/Sky/Planets/images/Rings%20%287%29.jpg
Step 37
Choose a light blue color for your planet rings or what ever color you like that matches your planet.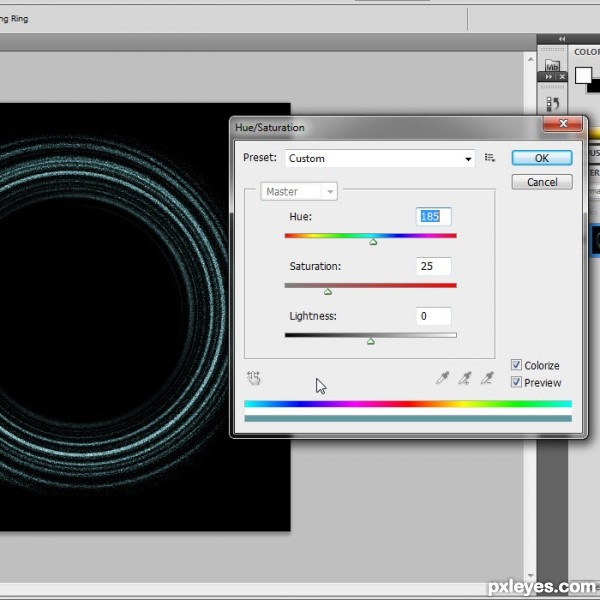
Step 38
Next we need to make a mask of our texture, to do this click on Select then on Color Range.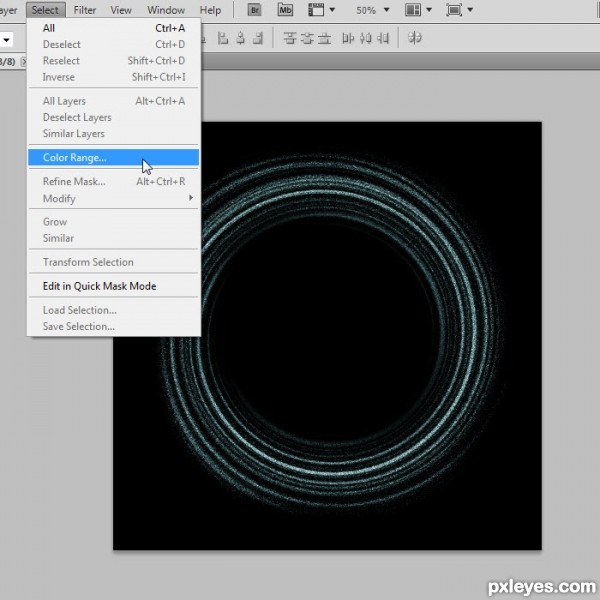
Step 39
Next click on any black part of your image and set the Fuzziness to 40%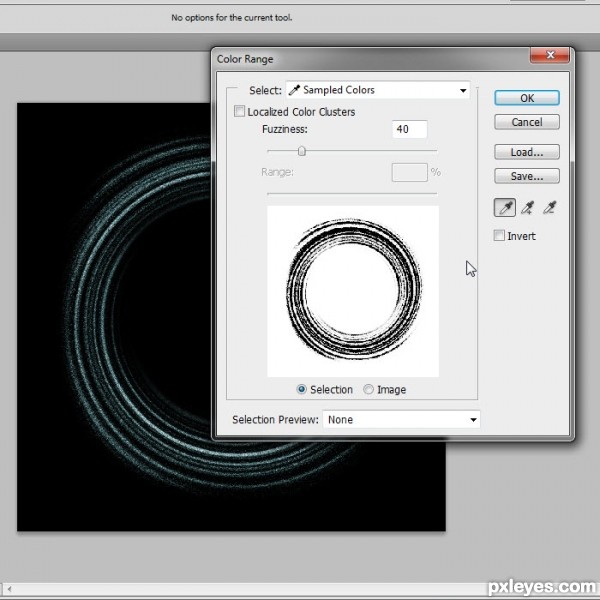
Step 40
Next we need to invert our selection so click on Select and then Inverse.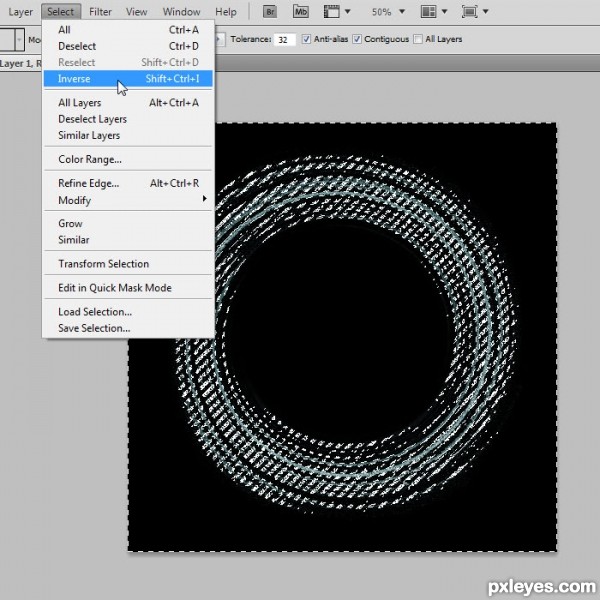
Step 41
Next create a new layer and select your paint bucket, fill your new selection with white, this is your new mask.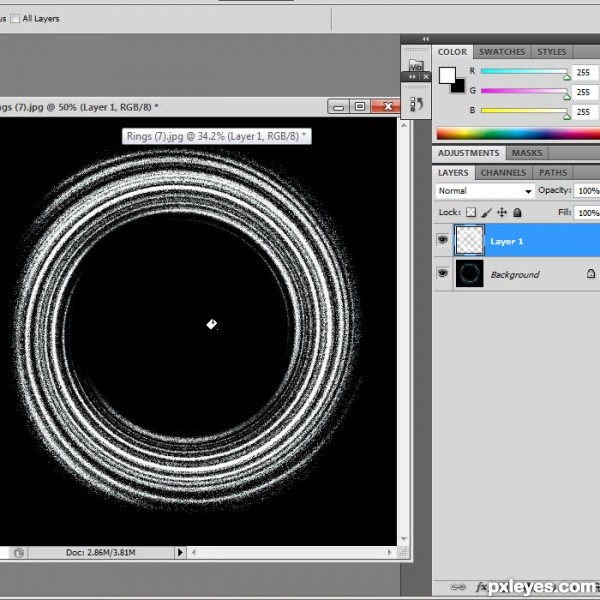
Step 42
Save both files, first save your original texture by turning off the top mask layer.Save as Rings (7).jpg and then save your Mask as Rings (7) mask.jpg
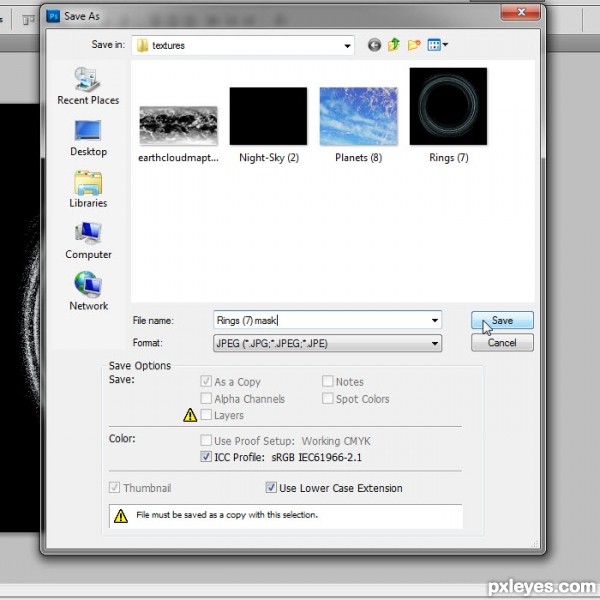
Step 43
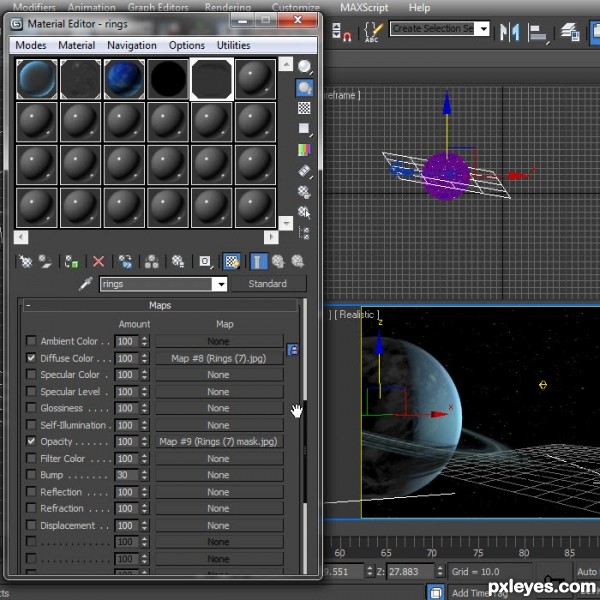
in 3DS Max create a new texture and place the Ring texture in the diffuse mapping channel and the Mask texture in the opacity map channel.Apply this texture to your plane that is around your planet. You can also copy the mask texture to your bump mapping channel and give it a setting of 100 so it gives the rings some depth.
Step 44
Next Right click on your planet rings and chose properties.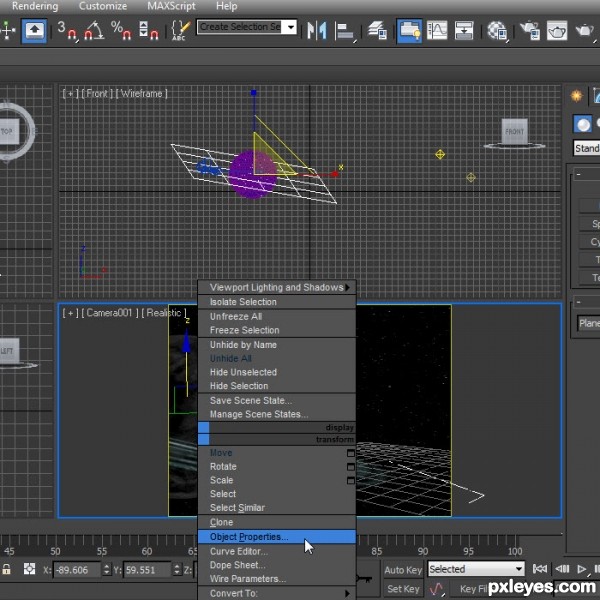
Step 45
Un-check Cast Shadows, so your rings will not cast any shadows on to your planet.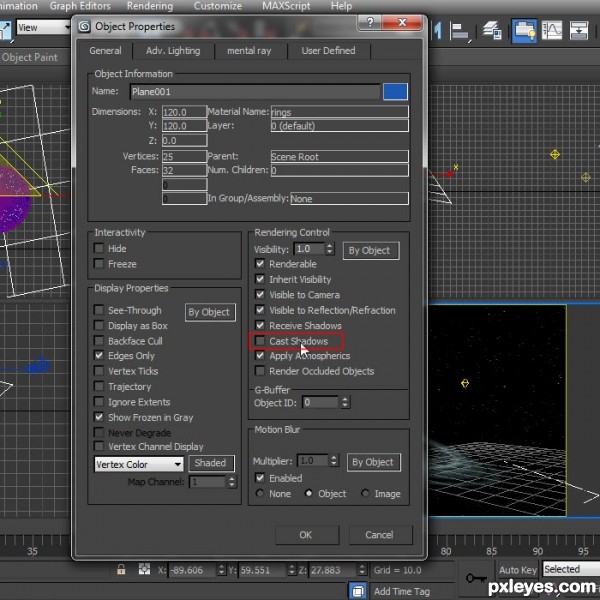
Step 46
Next Render and we should have something like this.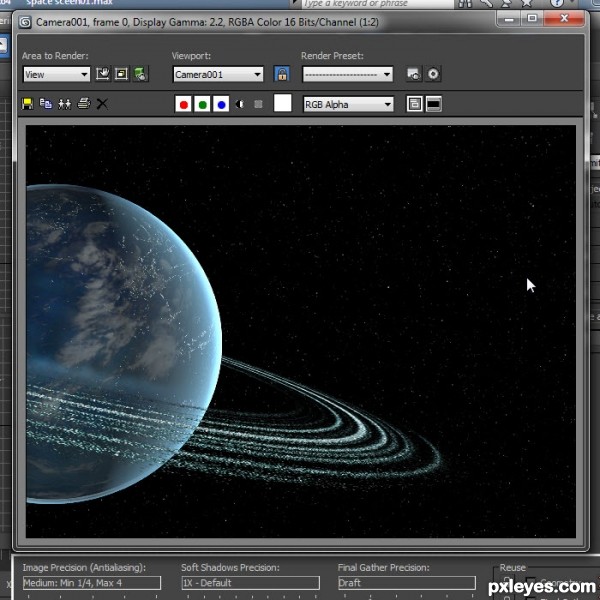
Step 47
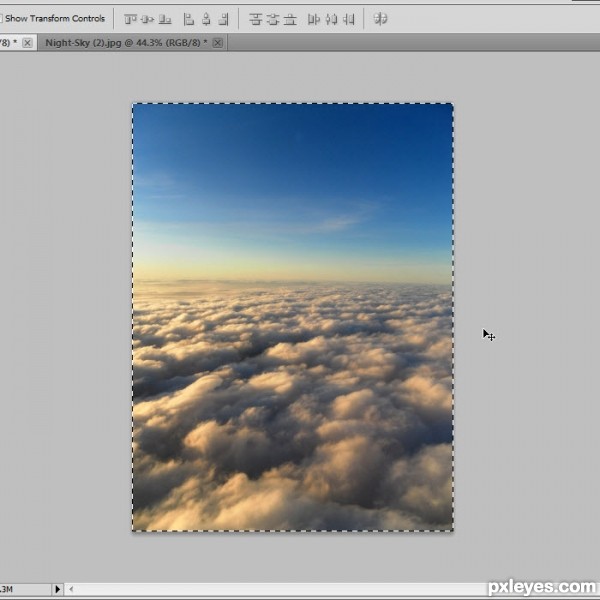
Next bring in this texture to Photo shop or any other cloud texture you like.You can get this texture here.
http://www.morguefile.com/archive/display/746544Sources used: 12: http://www.morguefile.com/archive/display/746544
Step 48
Next bring in your star background you downloaded earlier that you are now using as the background of your scene.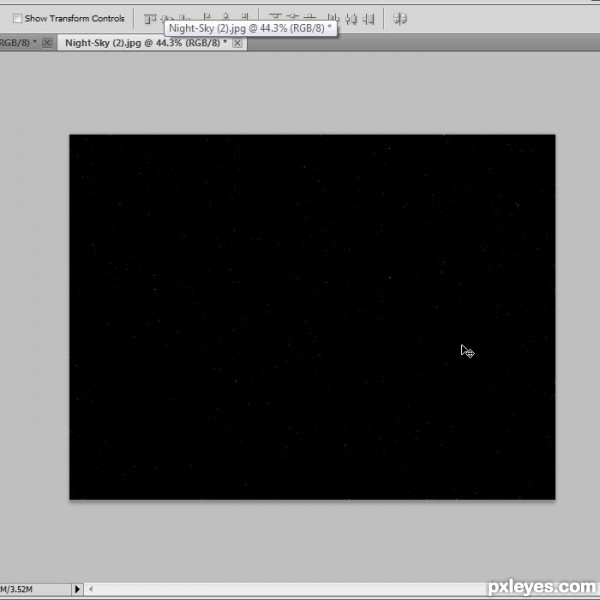
Step 49
In Photo shop, select Adjustments then Levels.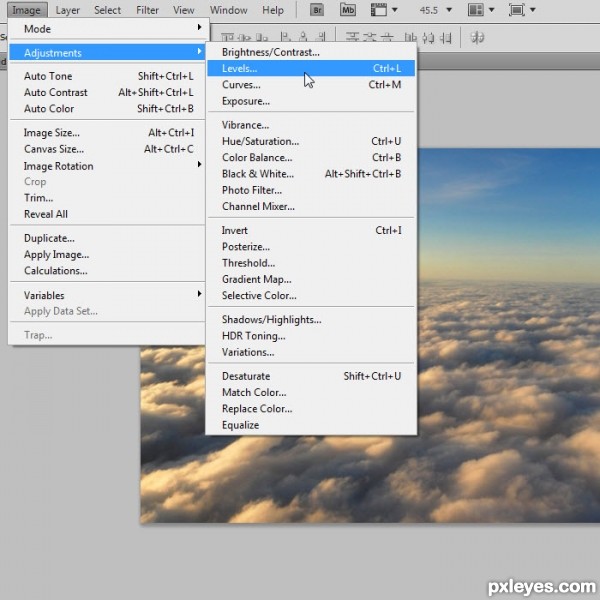
Step 50
I used a setting of 107 on left 1.00 on middle and 217 on right.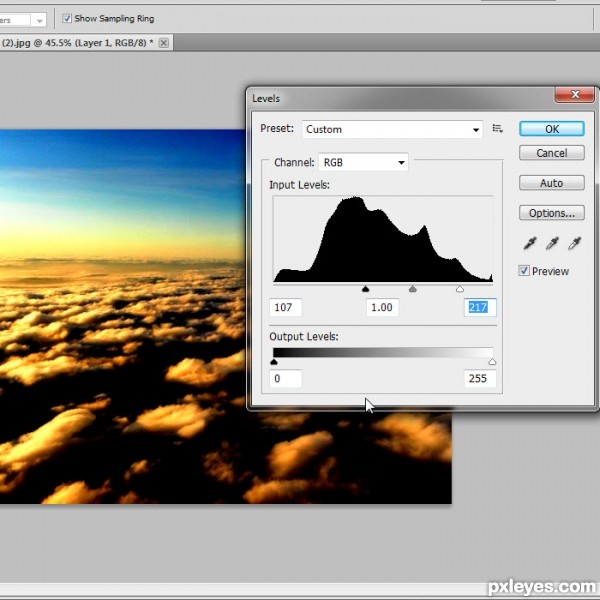
Step 51
Next copy your new cloud texture onto your star background and if the image is to big, just re-size it so the image fits like this.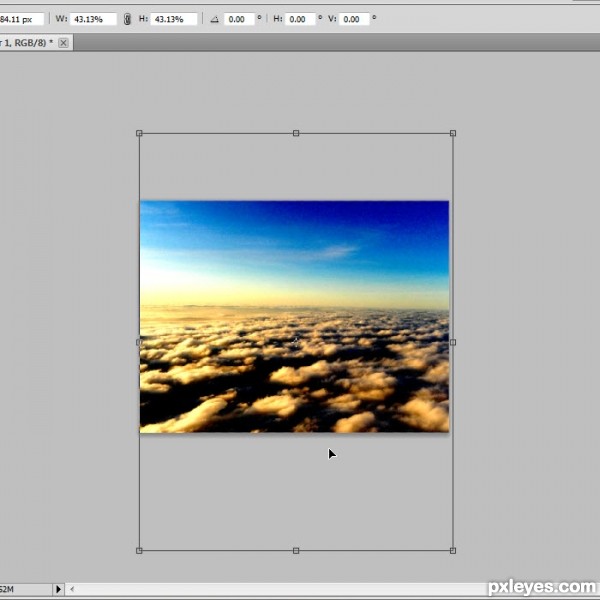
Step 52
Set its blending mode to Screen.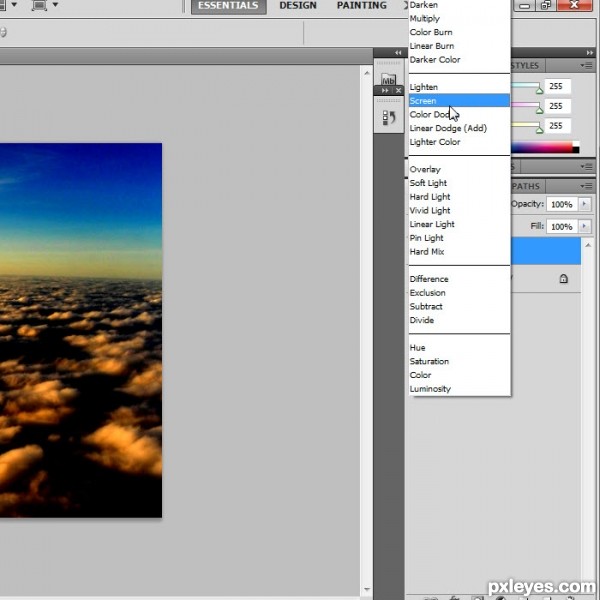
Step 53
Next select a big eraser and start erasing away the top blue sky part, so you get something like this.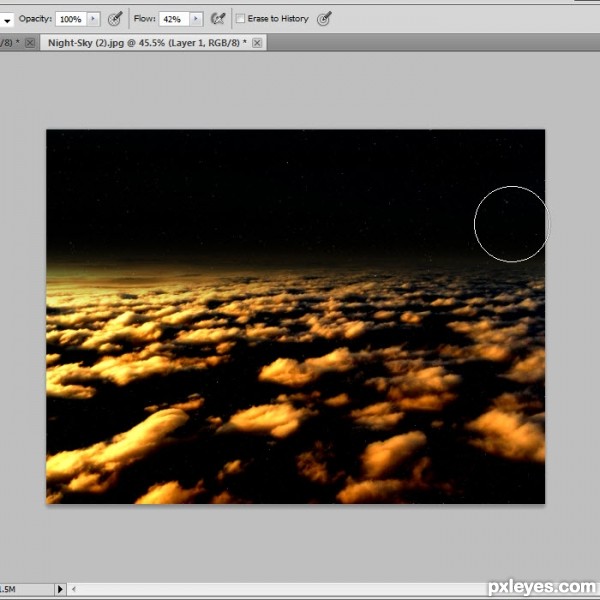
Step 54
Next do a Hue/Saturation again as seen here.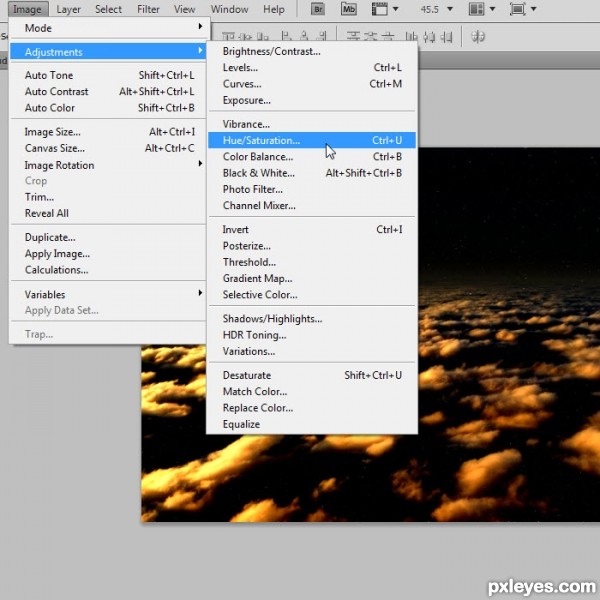
Step 55
Choose a light blue like this.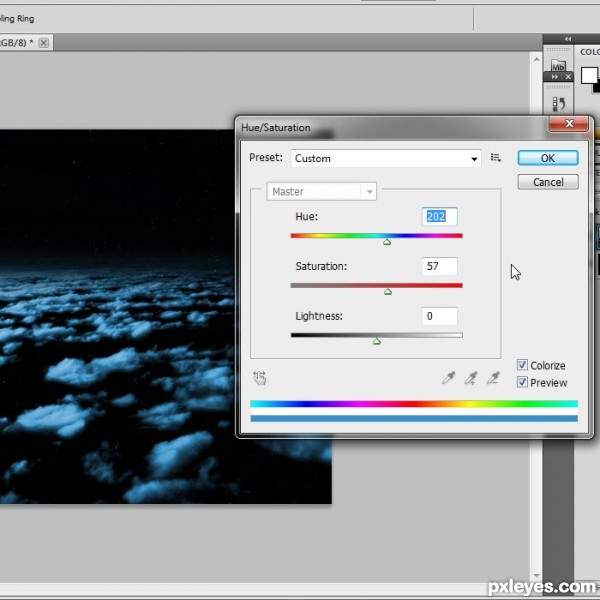
Step 56
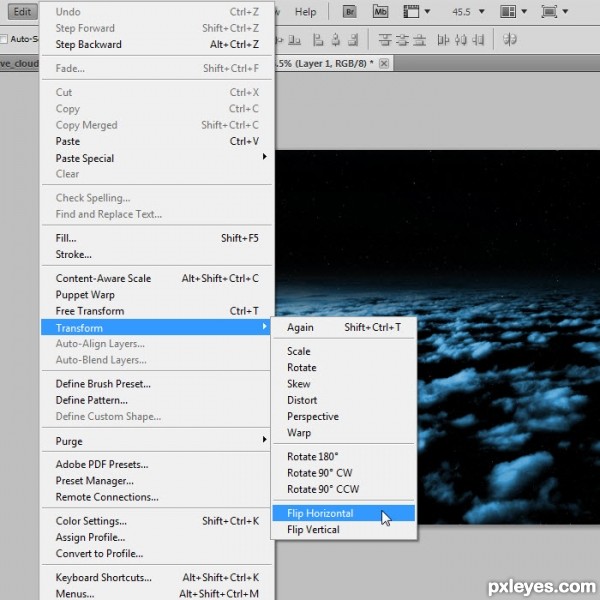
Next since our scene in 3DS Max is set so the sun is shining to the left, we need to flip our image around.Do this in Edit, then Transform then Flip Horizontal.
Step 57
Now save your background as the same background file you have set in your scene. Night-Sky (2).jpg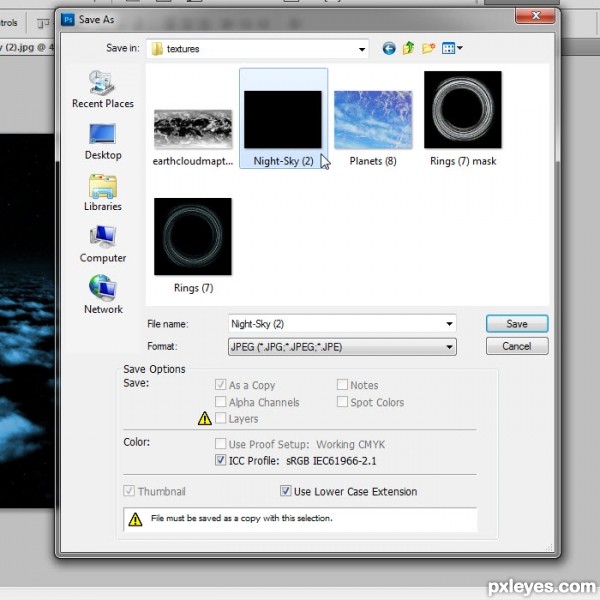
Step 58
Next do a test Render and we should get something like this.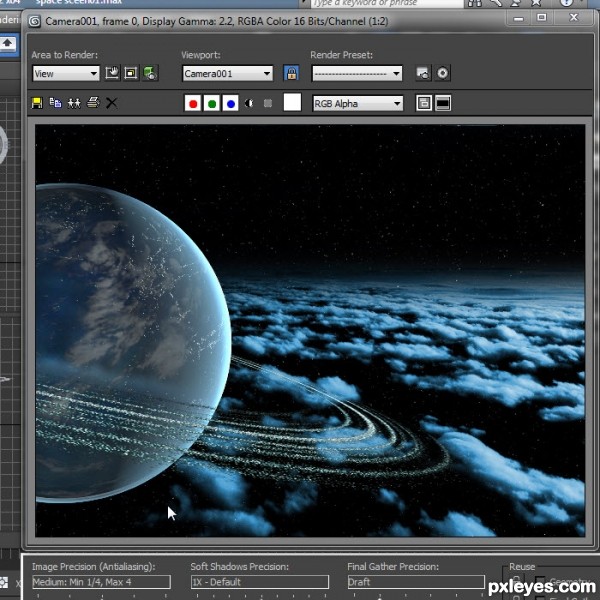
Step 59
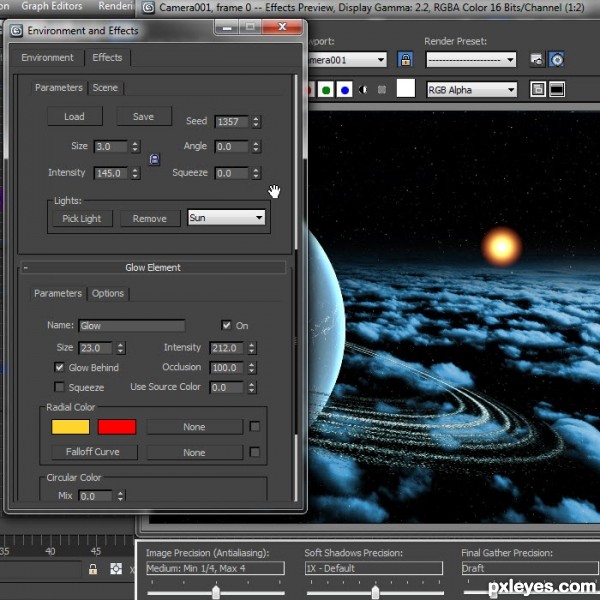
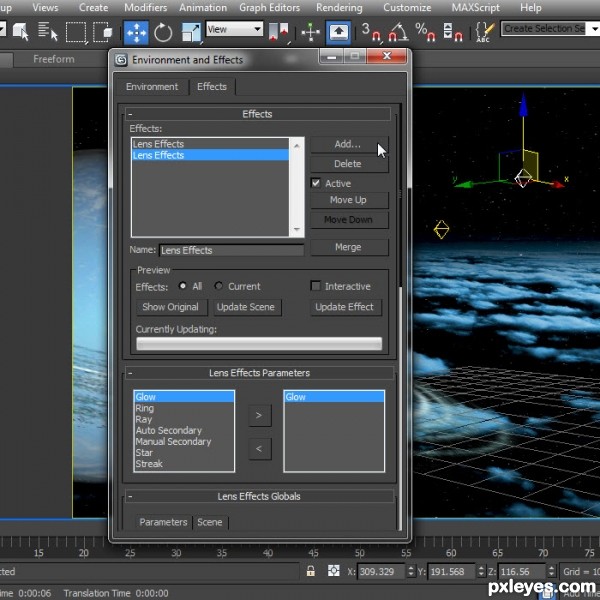
For our first sun, select your Omni light labeled Sun and then click on Rendering and then Effects.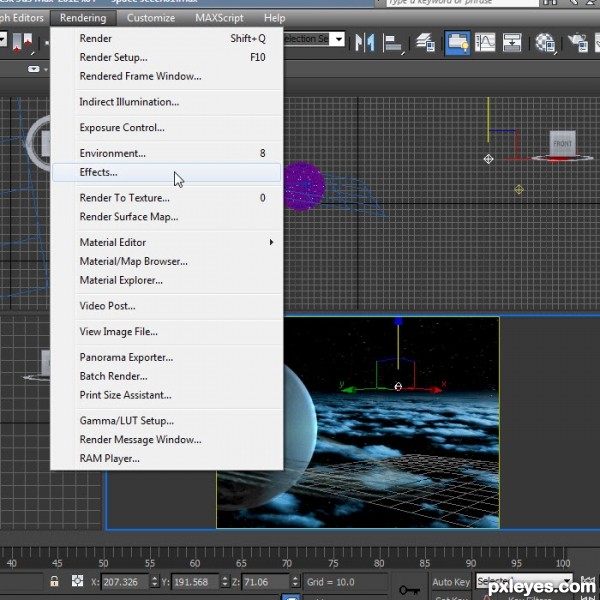
Step 60
Next click on Add and then select Lens Effects.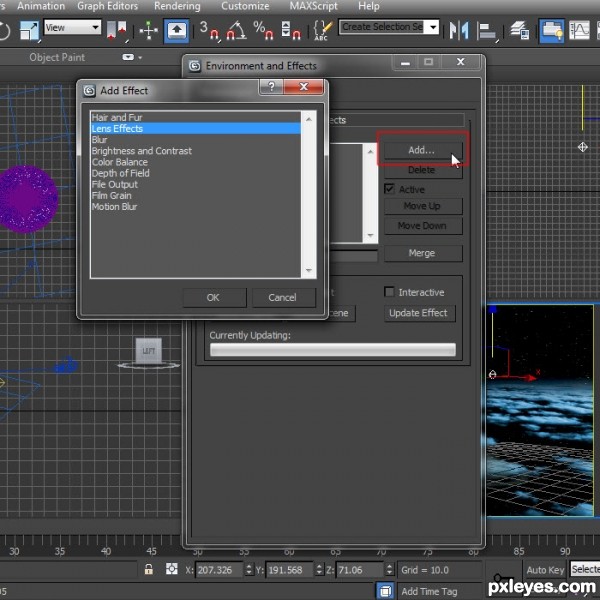
Step 61
Next click Glow and then click the right arrow so we select glow, in or effects.
Step 62
These are the settings I used for my first sun.First set. Size 3.0 Intensity 145.0
Second set. Size 23.0 Intensity 212.0
colors yellow and red.
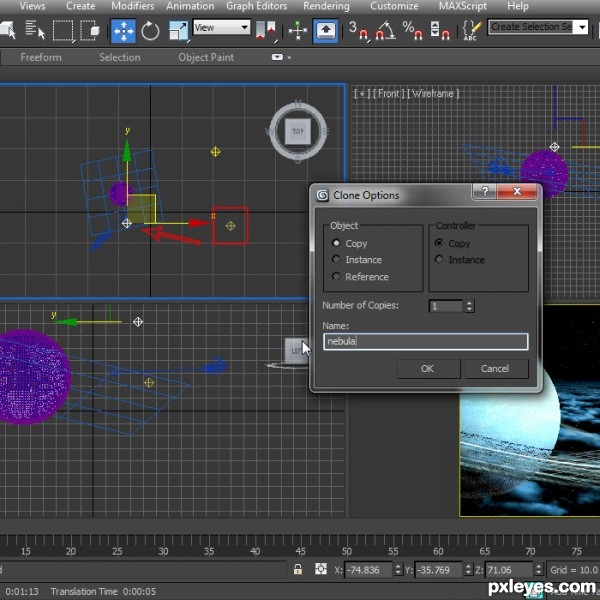
Step 63
Next make a copy of one of your lights. Do not use a copy from the sun light.Name this new copy Nebula and position it in front of your planet.
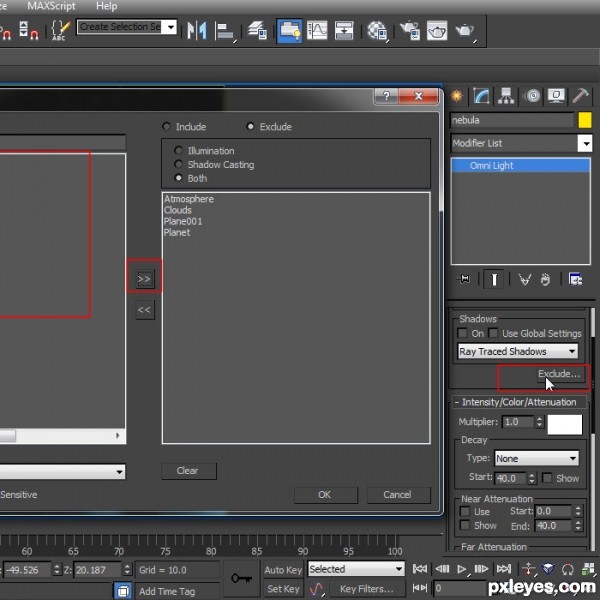
Step 64
Next click on Exclude in your light properties and select everything in your scene, then click on the double right arrows to move everything into the exclude area.This will allow us to use the light with no light shining on any objects.
Step 65
Next click on rendering and then Video Post.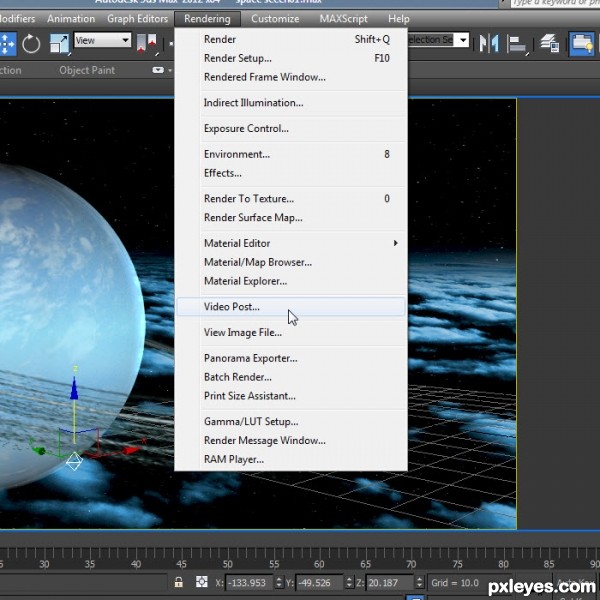
Step 66
In video post click on Add Scene Event. That is the little blue teapot icon.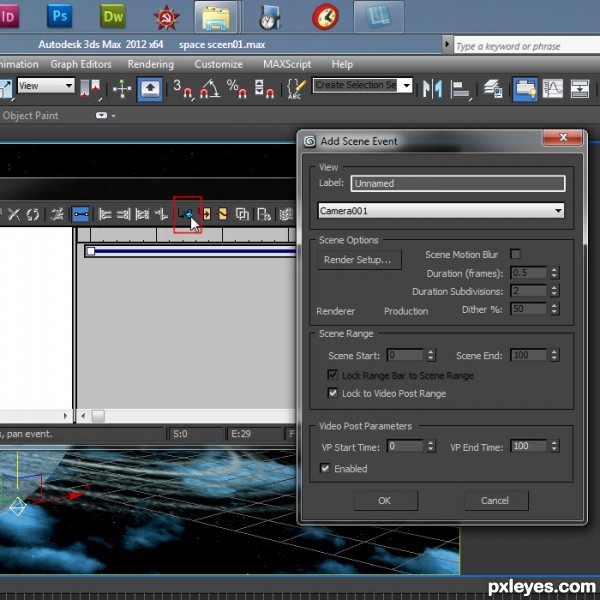
Step 67
Next we need to add an Add Image Filter Event, to our scene.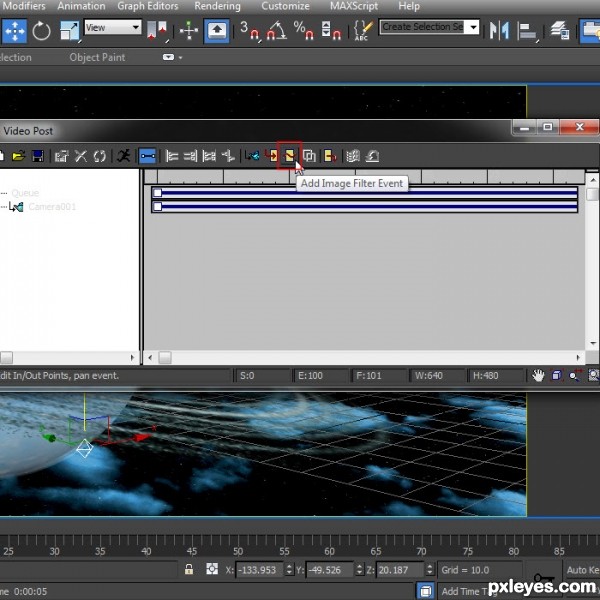
Step 68
Chose Lens Effect Flare as the Filter Event.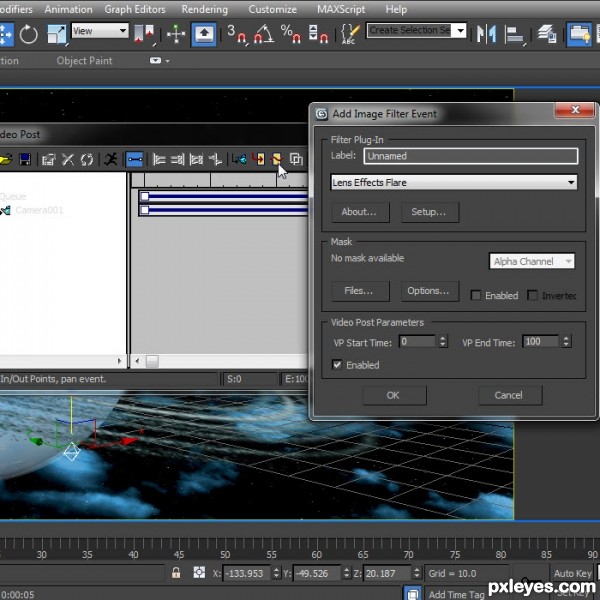
Step 69
Close out your Lens Effects Flare filter and then double click on it to open it again. This time click on Setup.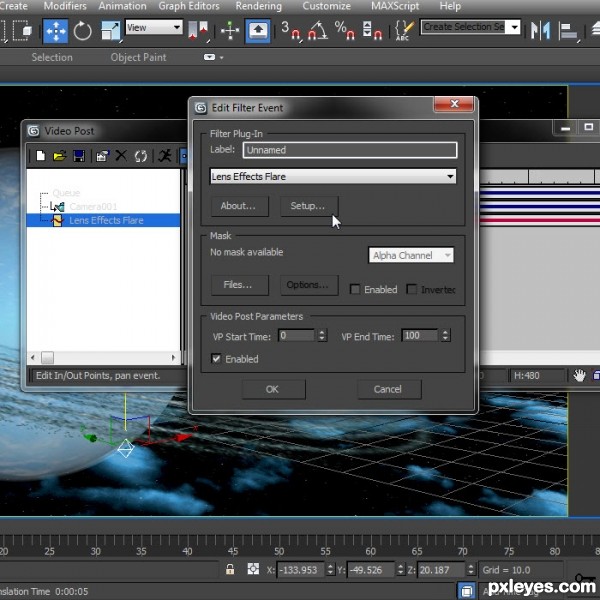
Step 70
We should now have something like this displayed.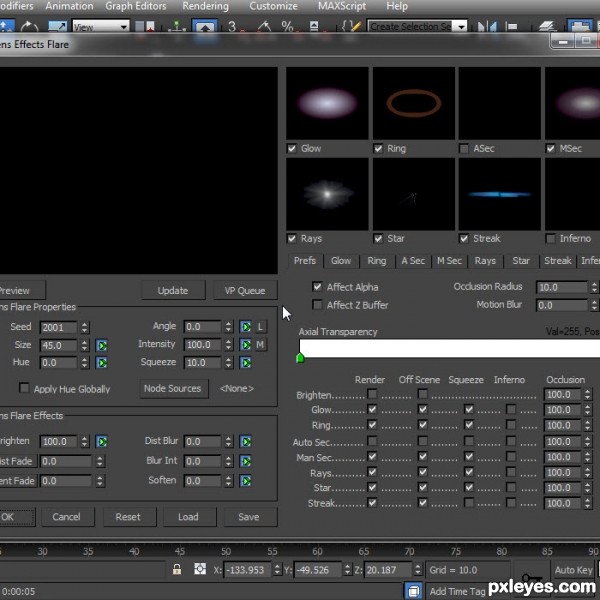
Step 71
Next click on Node Sources and then chose Nebula as the object.
Step 72
Next un-check all in render except Man Sec. This one you want to check an extra place in Inferno.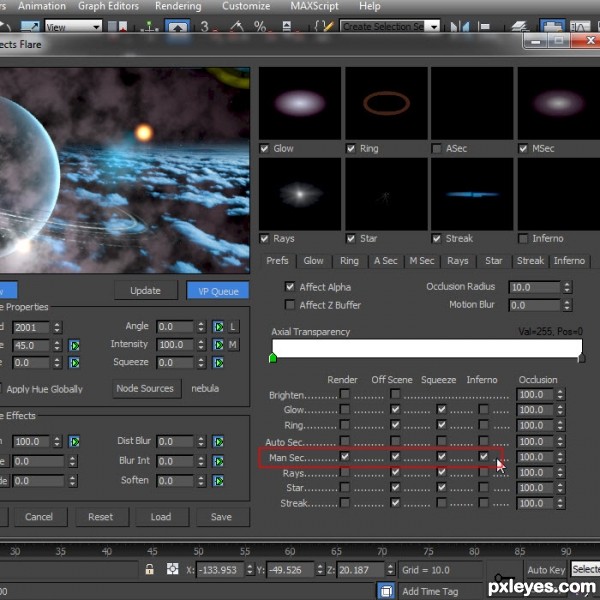
Step 73
Set the size to 280.0 set the Scale to 10.0 Set squeeze to 12 and change the colors to something you like. I used a light green and purple.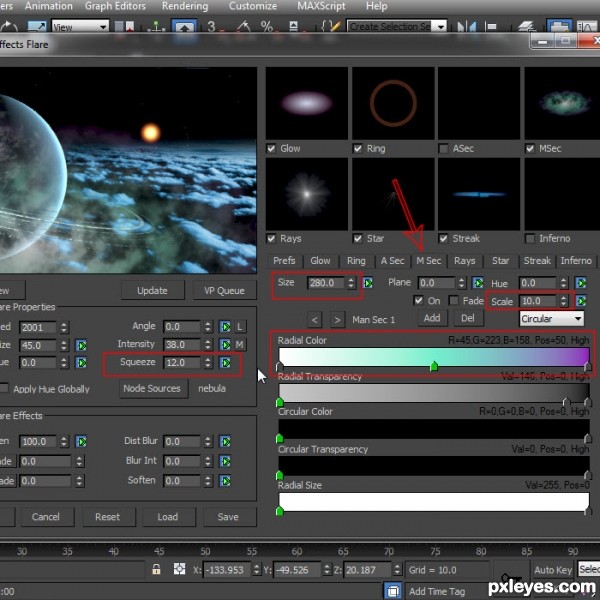
Step 74
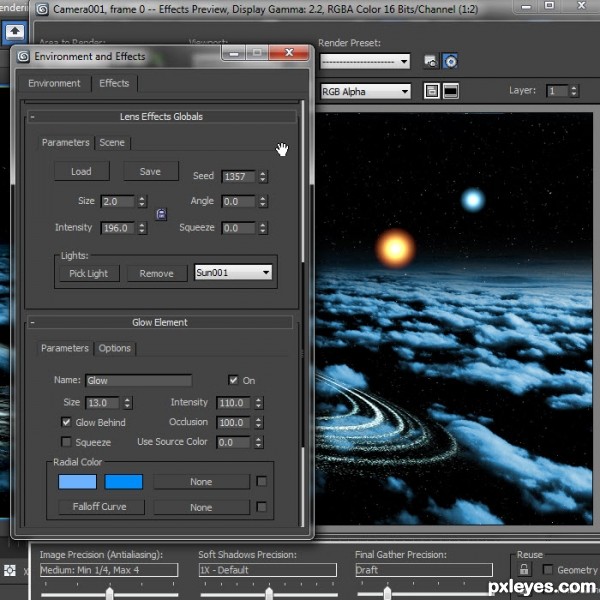
Next create a new light, place it near the sun light and name it Sun2.Next go back into the effects panel. Rendering then effects and chose another Lens Effects, then Glow for your new sun.
Step 75
First settings are Size 2.0 Intensity 196.0Second set. Size 13.0 Intensity 110.0
Colors are blue, light and darker.
Step 76
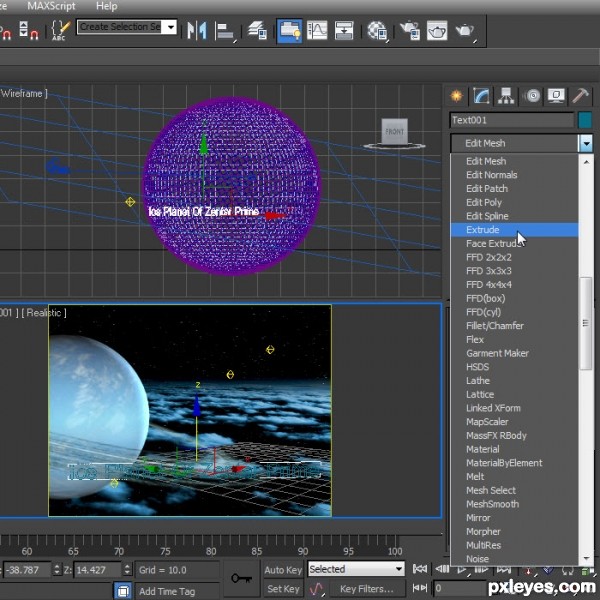
For text I used a spline in the shapes tab.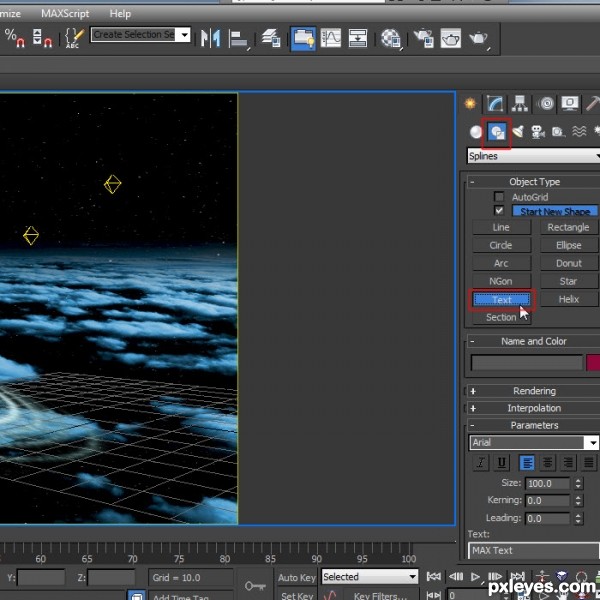
Step 77
Place it in your scene, in front of your camera.Rotate it so it faces your view and then apply an Extrude modifier to it as seen here.
Step 78
For the text I used Andalus type face and the size I used was 7.35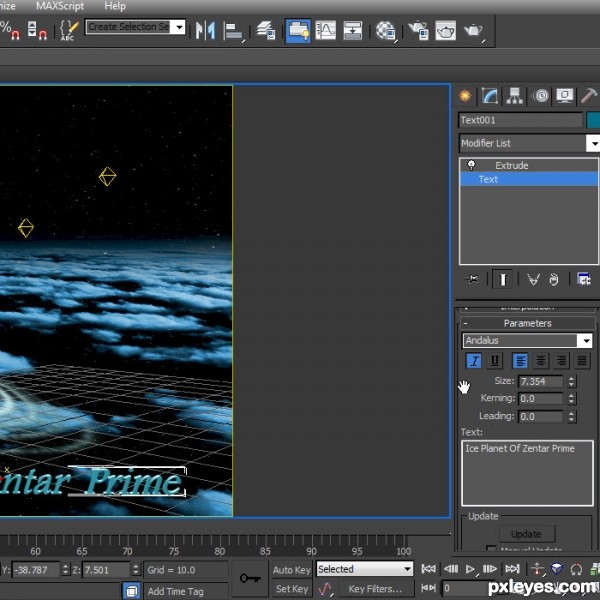
Step 79
Texture your text any way you like. I am going to use a Ceramic texture standard with 3DS Max.The text is optional. :)

Step 80
To render a final render of our scene we need to render from video post.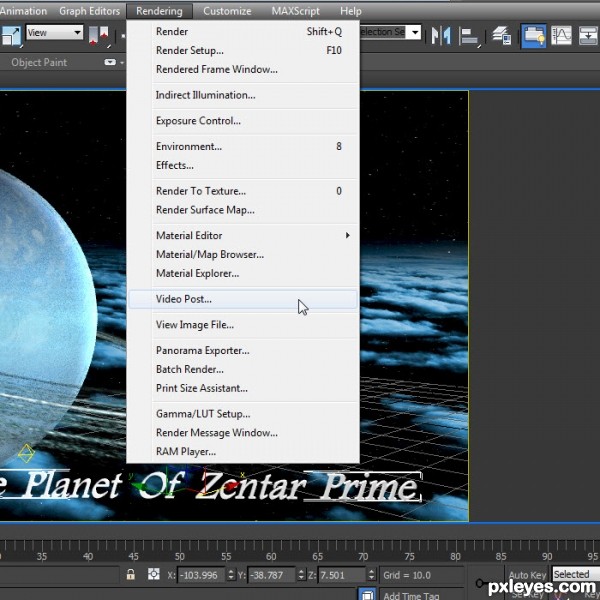
Step 81
Set the settings the same as in your regular render menu, width 1280 height 960. Set the time output to single and press Render.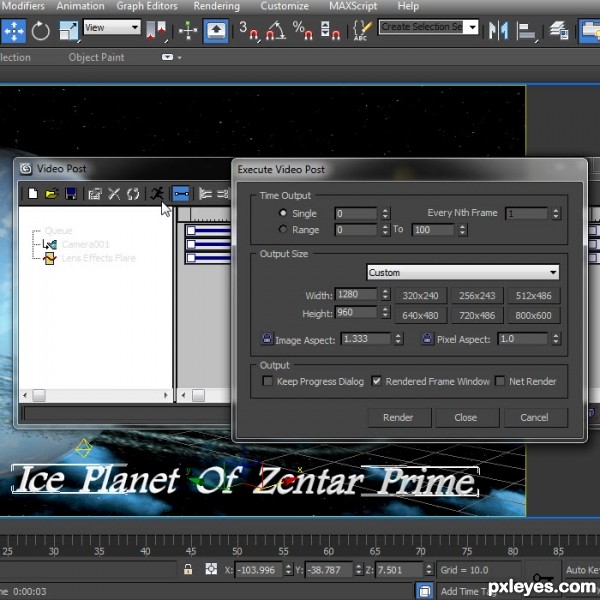
Step 82
Final render.

No comments:
Post a Comment