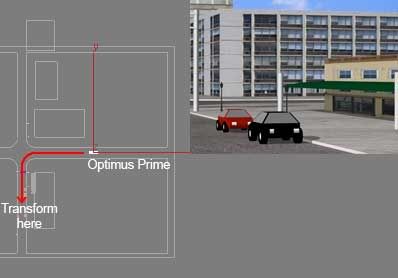
I created simple city scene, and you will animate the truck here. The scenario is Peterbilt truck drive fast, turn, and then change into robot. I already create Peterbilt truck animation. Here, I animated "Dummy car" object using manual keyframing. Our next job is creating transformation animation.
2. Believe it or not, but when Optimus Prime or other Transformers robot changing shape, it just needs 1 second. Thus, you will create 30 frames animation (1 second=30 frames in NTSC). Here I will create animation from frame 180 to 210.
For easy animation, I divide the animation into six steps. Each step has 6 frames (180-185, 185-190, 190-195, 195-200, 200-205, and 205-210).
To create animation, activate AutoKey, Local coordinates, and 3D Angle Snap. Local coordinates enable you to rotate along each object axis. And 3D Snap enable you to rotate in certain amount, useful when you want to precisely rotate 90 degrees. Mostly you will use Select And Rotate tool.
To create first step animation (180-185), move slider to frame 185. Select one object, for example "bumper left 1". Rotate clockwise 90 degrees. 2 keyframes will be created. One in frame 0 and the other in frame 185. Select keyframe in frame 0 and move to frame 180. Thus, you created animation from frame 180 to 185.
For other animation, you can simply repeat the above process.
3. Image below will show you what objects needs to be animated in frame 180-185, and where the rotation direction is. Note: L&R means both left and right side need to be animated.
4. Animation in frame 185-190. You need to move "Dummy robot" up, so the robot will stand up. Object "piston small" is need to be moved inside the big piston. So, both pistons should have shorter length. This is no problem is you use Local coordinate system.
5. Animation in frame 190-195. Move "Dummy robot" and IK Chain legs so the robot is stand up firmly. Rotate "Door" 90 degrees clockwise so it is at the side of legs. Select "piston big" object and rotate 90 degrees until it is at the side of the legs. Finally rotate "shoulder side" until it is side by side with "body upper".
6. Animation in frame 190-195. Rotate "Door" until it is at the back of robot. Do the same with "oiltank big". Rotate "Knee". Also rotate "body upper lid" until it is behind the head. Finally, move IK chain legs to pose them.
7. Animation in frame 190-195. Move IK Chain arm. Move "head base" up so you can see Optimus Prime head. And rotate all "hand lid" to open the wrists.

8. Animation in frame 190-195. Rotate "shoulder add". Move all "hand base" objects so you can see the hands. That's it. When finished, turn off Auto Key.
You can render the animation. If you want sound, I also include a WAV sound file (10 seconds). To add sound in 3ds max, you can read Adding Sound in 3ds Max
9. Steps above produce the basic animation. Sample of this animation is available in downloaded file (optimusprime_animation_finish_basic.max)
You can modify yourself to create better animation. For example create a better posing and add random movement to the right and left side. Video below shows example of modified and better animation. Sample of this animation is also available in downloaded file (optimusprime_animation_finish_modified.max)


No comments:
Post a Comment