by Didik Wijaya
 Someone, I think she is a beginner user in 3ds max, once told me, she didn't confident much about her modeling skills. She couldn't create human, or other amazing detailed creatures. I guess many 3ds max newbies felt the same thing. I was once a newbie too. From my experience, designing in 3ds max doesn't always meant to create high detailed amazing creature or else. Many designers make a living only by creating logos or creating something simple or funny like the one I explained in this tutorial. In this tutorial I will show you how to model simple but cute cartoon bear. Here, I am just using simple primitives and modifiers. But, hey it's work.
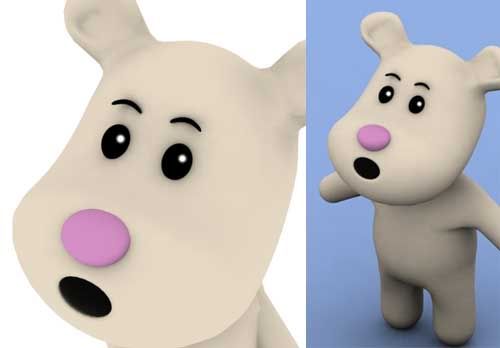
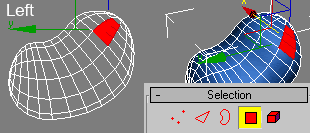
This is what you are going to create:
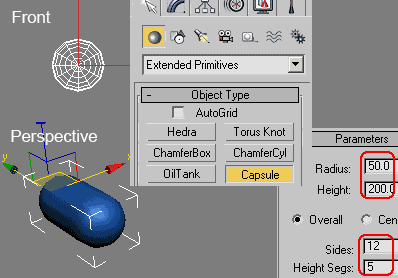
1. Create a Capsule in Front viewport. Use Radius=50, Height=200, Sides=12, and Height Segs=5.
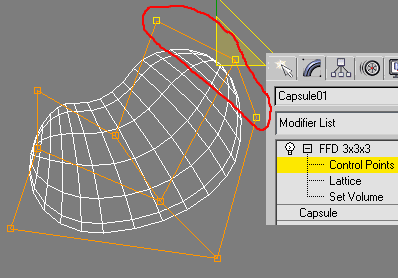
2. Apply Capsule with FFD 3x3x3 modifier. In Modifier Stack, click plus (+) sign, and highlight Control Points. These control points enable you to deform object. Move control points, until you get object similar to a bean. This will be used as bear's head.
After that, select all control points located at the top of object.
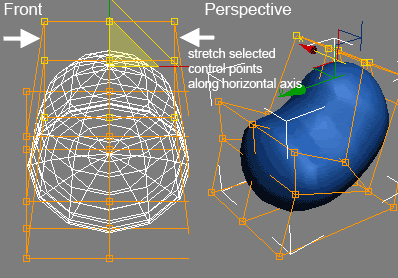
3. In Front viewport, use Select And Uniform Scale tool to stretch selected control points along horizontal axis. Top of the should be a less wider.
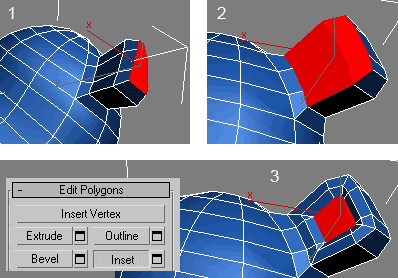
4. Next, creating an ear. Right click object and choose Convert To>Convert To Editable Poly. Go to Modify tab. Activate Polygon selection. Select three polygons at top of object (look at image below). Note: Press F4 to enable edge view. To select more than one polygon, hold Ctrl while selecting.
5. To create an ear, (1) Bevel selected polygons three times, (2). Select polygons at front side of ear, (3) Apply Inset, and then Bevel inward like image below.
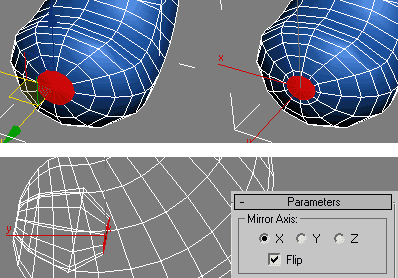
6. Next, creating a mouth. Select polygons like image below. Apply Inset, and then Bevel three times inside the object. Basic head object is finished. When finished, turn off all sub-object selection. Apply Symmetry modifier with Axis=X and activate Flip.
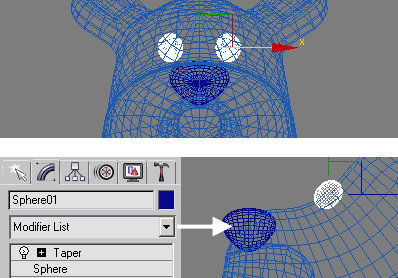
1. To create eye, use Sphere. Scale, stretch, and position in its location. To create another eye, select sphere, and move while holding Shift to clone.
Nose is created using Sphere applied with Taper. Create a sphere in Front viewport. Apply Taper. Use Amount=0.5 with Primary Axis=Y. Scale and move sphere when necessary.
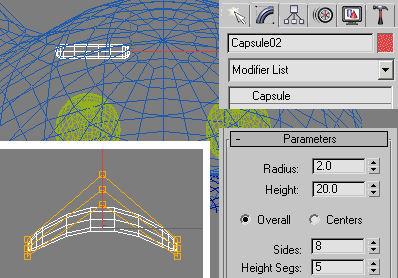
2. Next, eyebrows. Create a capsule in Left viewport. Use Radius=2, Height=20, Sides=8, Height Segs=5. Apply with FFD 3x3x3 modifier. Modify control points position. Again clone to create other eyebrow.
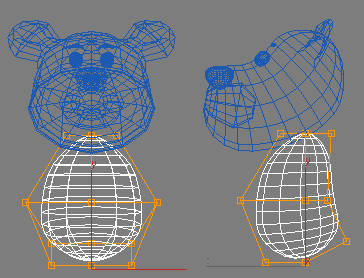
3. Use sphere as body. Apply FFD 3x3x3 and move control points to get desired body shape.
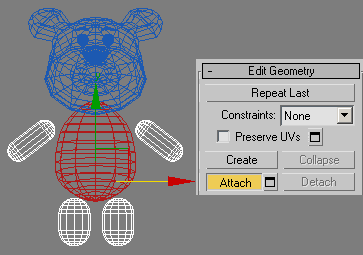
4. Create Capsule 4 times to create arms and legs. Rotate and move them. Convert body into Editable Poly. Go to modify tab, in Edit Geometry rollout, click Attach button. Click all arms and legs to combine them into one single object.
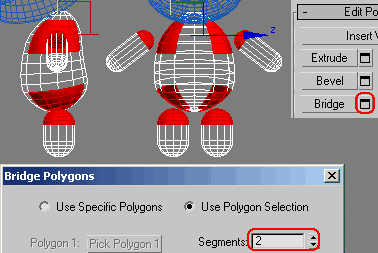
5. Activate Polygon selection. Select polygons in area where we will joint body with arms and legs. Look at image below for reference. After that, in Edit Polygons rollout, click Bridge Settings buttons. In opened dialog box, use Segments=2 and click OK. All arms and legs should now connected to body.
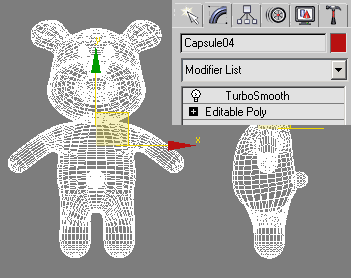
6. Add one small sphere to be used as tail. Attach this sphere to body object. Apply Turbosmooth modifier to head and body object.
7. Cute Cartoon Bear 3D model is finished. Image below shows rendered image. I combined all eyes, nose, eyebrows, as a single head object:. I also use Multi/Sub Object Material to this model.


No comments:
Post a Comment